A watchOS 2 WatchKit Glance Tutorial
| Previous | Table of Contents | Next |
| An Overview of watchOS 2 WatchKit Glances | A watchOS 2 WatchKit Context Menu Tutorial |
| Purchase the full edition of this watchOS 2 App Development Essentials book in eBook ($12.99) or Print ($27.99) format watchOS 2 App Development Essentials Print and eBook (ePub/PDF/Kindle) editions contain 35 chapters. |
The tutorial outlined in this chapter will add a glance scene to the TableDemoApp created in the chapter entitled A watchOS 2 WatchKit Table Tutorial and will make use of the various glance capabilities outlined in the previous chapter, including the addition of a glance to an existing Xcode project and the passing of context data from the glance to the corresponding WatchKit app.
About the Glance Scene
The TableDemoApp project consists of a table containing a list of workout exercises for a fitness app. When a table row is selected by the user the app navigates to a second scene containing more detailed information about the chosen exercise. In this chapter, a glance scene will be added to this project, the purpose of which is to allow the user to display a summary of the exercise last selected in the WatchKit app. Through the use of context data, tapping the display from within the glance scene will launch the WatchKit app and automatically navigate to the corresponding detail scene.
If you have already completed the TableDemoApp project as outlined in the A WatchKit Table Tutorial and Implementing WatchKit Table Navigation chapters of this book, open the project in Xcode now. Alternatively, the completed project may be downloaded along with the other sample projects at the following URL:
http://www.ebookfrenzy.com/code/watchOS2BookSamples.zip
Adding the Glance to the Project
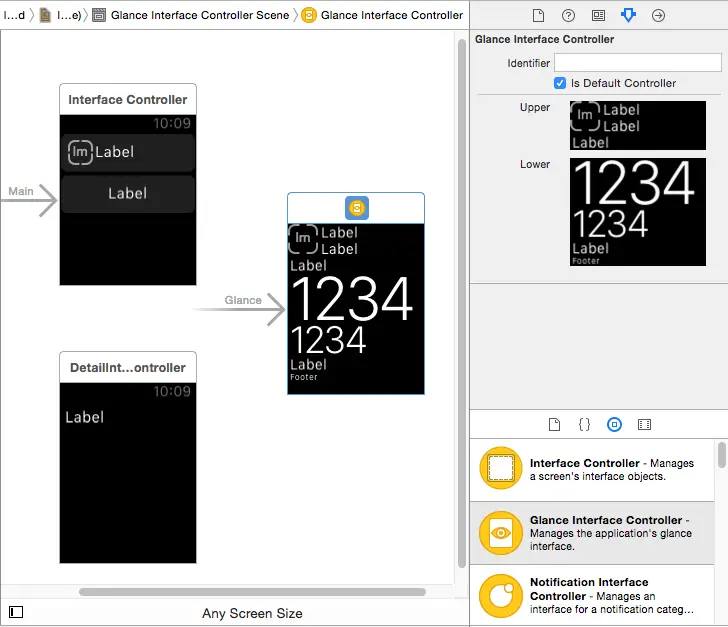
To add the glance scene to the WatchKit app storyboard, select the Interface.storyboard file so that it loads into the Interface Builder tool and drag and drop a Glance Interface Controller object from the Object Library panel onto the storyboard canvas (Figure 15-1):
Figure 15-1
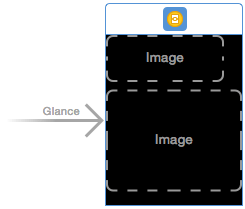
With the Glance scene selected in the storyboard, use the Attributes Inspector panel to change both the upper and lower sections of the glance scene to each contain a single Group object containing Image objects as shown in Figure 15-2:
Figure 15-2
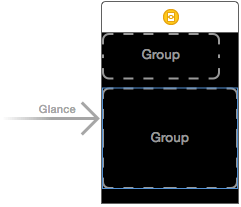
Select each of the Image objects and, using the keyboard delete key, remove the objects from the scene leaving behind just the Group objects:
Figure 15-3
Next, add an interface controller to accompany the glance scene by Ctrl-clicking on the TableDemoApp WatchKit Extension entry in the Project Navigator panel, selecting the New File… menu option and creating a new watchOS Source WatchKit Class file named GlanceController and subclassed from the WKInterfaceController class.
Return to the Interface.storyboard file and select the Glance Interface Controller scene so that it highlights in blue. Display the Identity Inspector panel and select the newly added interface controller class from the Class drop-down menu.
The final step is to add a build scheme for the glance scene by duplicating and modifying the existing WatchKit App scheme. Begin by selecting the WatchKit App scheme in the run target menu as shown in Figure 15-4:
Figure 15-4
Display the run target menu again, this time selecting the Edit Scheme… menu option. Within the scheme editing panel, click on the Duplicate Scheme button located in the lower left hand corner and, in the name field located in the upper left hand corner, replace the “Copy of” text with a “Glance – “ prefix.
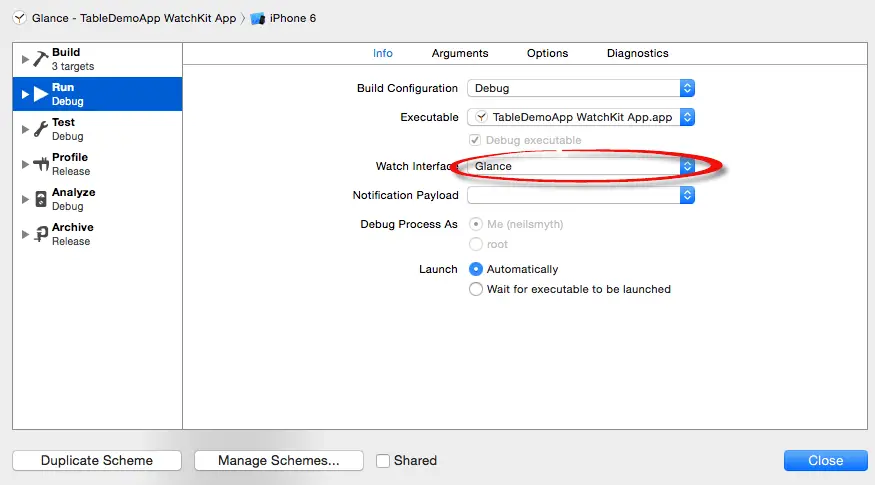
With the new scheme created and appropriately named, select the Run option on the left hand panel and change the Watch Interface option menu in the main panel from Main to Glance as shown in Figure 15 5:
Figure 15-5
Close the panel to commit the changes, at which point the glance is now integrated into the TableDemoApp WatchKit app extension.
Designing the Glance Scene Layout
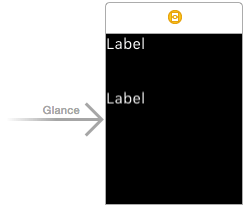
The glance scene will use the previously prepared template layout consisting of the two Group interface objects. With the Interface.storyboard file displayed within Interface Builder, drag a Label object into each of the group containers within the glance scene as shown in Figure 15-6:
Figure 15-6
Select the Label object in the upper group container, display the Attributes Inspector panel and change the Vertical property listed under Alignment to Center.
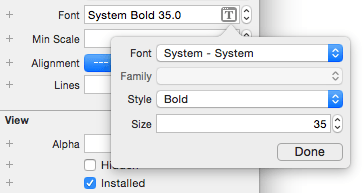
Select the Label object located in the lower group and change both the Horizontal and Vertical properties in the Alignment section of the panel to Center. With the Label object still selected, click on the ‘T’ icon in the Font property field, change the Font menu to System and change the Style menu to Bold. Before clicking on the Done button, increase the Size value to 35:
Figure 15-7
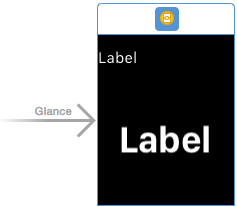
On completion of these steps, the layout of the glance scene should match that outlined in Figure 15-8:
Figure 15-8
Establishing Outlet Connections
The interface controller for the glance scene will need access to the two labels to change the text that is displayed to the user. Keeping the Interface.storyboard file loaded in the Interface Builder tool, display the Assistant Editor panel and make sure that it is displaying the content of the GlanceController.swift file. Ctrl-click on the upper label in the glance scene and drag the resulting line to a position immediately beneath the class declaration line in the Assistant Editor panel. Release the line and create an outlet connection named titleLabel. Repeat this step to connect the lower label to an outlet named mainLabel. At this point the beginning of the GlanceController.swift file should read as follows:
import WatchKit
import Foundation

class GlanceController: WKInterfaceController {

    @IBOutlet weak var titleLabel: WKInterfaceLabel!
    @IBOutlet weak var mainLabel: WKInterfaceLabel!

    override func awakeWithContext(context: AnyObject?) {
        super.awakeWithContext(context)

        // Configure interface objects here.
    }
.
.
}
Adding Data to the Glance Interface Controller
Now that the user interface of the glance scene is designed and the Label objects are connected to outlets in the interface controller, some data needs to be added to represent the information to be presented when the glance is displayed by the user. The information contained within the glance will consist of the currently selected exercise and a reminder of the duration or number of repetitions to be performed.
Select the GlanceController.swift file and add two data arrays to the class so that it reads as follows:
import WatchKit
import Foundation

class GlanceController: WKInterfaceController {

    @IBOutlet weak var titleLabel: WKInterfaceLabel!
    @IBOutlet weak var mainLabel: WKInterfaceLabel!

    let titleData = ["Warm-up", "Cardio", "Weightlifting", "Core", "Bike", "Cooldown"]
    let durationData = ["20 mins", "30 mins", "3 x 10", "2 x 20", "20 mins", "20 mins"]

    override func awakeWithContext(context: AnyObject?) {
        super.awakeWithContext(context)

        // Configure interface objects here.
    }
.
.
}
Storing and Retrieving the Currently Selected Table Row
When the glance is invoked by the user it will need to know which row within the corresponding WatchKit app was last selected by the user. The WatchKit app interface controller, therefore, needs to store this information in a location where it can also be accessed by the glance interface controller. Since this is a small amount of data, the ideal location is within user defaults storage using the NSUserDefaults class.
The selection of a table row results in a call to the didSelectRowAtIndex method of the main WatchKit app interface controller which now needs to be updated to save the current index value. Within the Project Navigator panel, select the InterfaceController.swift file, locate the didSelectRowAtIndex method and modify it as follows:
override func table(table: WKInterfaceTable, didSelectRowAtIndex rowIndex: Int) {
    pushControllerWithName("DetailInterfaceController",
         context: detailData[rowIndex-1])

    let userDefaults = NSUserDefaults.standardUserDefaults()
    userDefaults.setObject(rowIndex, forKey: "index")
    userDefaults.synchronize()
}
Within the glance interface controller, this stored index value needs to be retrieved and used to display the correct information within the glance scene. Edit the GlanceController.swift file and modify the willActivate method to update the labels in the scene with the current information:
override func willActivate() {
    super.willActivate()

    let userDefaults = NSUserDefaults.standardUserDefaults()
    let index: Int? = userDefaults.integerForKey("index")

    if let arrayIndex = index {
        titleLabel.setText(titleData[arrayIndex - 1])
        mainLabel.setText(durationData[arrayIndex - 1])
    }
}
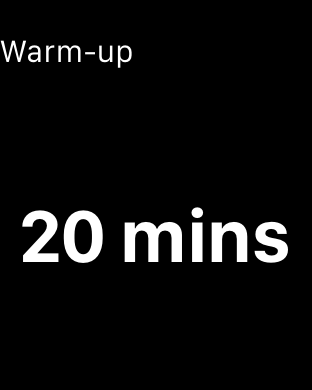
Test that the changes to the project work by running the WatchKit app within the Simulator environment and selecting the Warm-up row from the table so that the detail page appears. Next, within the Xcode toolbar change the run target to the Glance – TableDemoApp WatchKit App option and click on the run button. The glance scene should appear and display information relating to the selected Warm-up exercise as illustrated in Figure 15-9:
Figure 15-9
Tapping the glance scene will launch the WatchKit app. Note, however, that the app starts at the table scene and does not automatically navigate to the detail scene for the Warm-up exercise. To address this some code needs to be added to the project to pass context data from the glance to the WatchKit app.
Passing Context Data to the WatchKit App
As outlined in An Overview of watchOS 2 WatchKit Glances, a glance interface controller specifies the context data to be passed to the WatchKit app via a call to the updateUserActivity method. The ideal location in which to place this method call is within the willActivate method of the glance interface controller.
Edit the GlanceController.swift file and modify this method as follows:
override func willActivate() {
    super.willActivate()

    let userDefaults = NSUserDefaults.standardUserDefaults()
    let index: Int? = userDefaults.integerForKey("index")

    if let arrayIndex = index {
        titleLabel.setText(titleData[arrayIndex - 1])
        mainLabel.setText(durationData[arrayIndex - 1])
        updateUserActivity("com.example.TableDemoApp",
		userInfo: ["controller": arrayIndex], webpageURL: nil)
     }
}
The added code calls the updateUserActivity method, passing through a dictionary object consisting of a key (“controller”) and the current array index value.
When the WatchKit app is launched by a tap on the glance scene, the handleUserActivity method of the extension delegate will be called and passed the dictionary object specified when the updateUserActivity method was called. This method now needs to be implemented in the ExtensionDelegate.swift file, but first a method needs to be added to the InterfaceController.swift file that can be called by the handleUserActivity to display the appropriate detail scene content. Select the InterfaceController.swift file and add this method so that it reads as follows:
func displayDetailScene(index: Int) {
    pushControllerWithName("DetailInterfaceController",
		context: detailData[index-1])
}
This method accepts an index value and uses it to display the DetailInterfaceController with the appropriate detail content.
Next, add the handleUserActivity method to the ExtensionDelegate.swift file as follows:
func handleUserActivity(userInfo: [NSObject : AnyObject]?) {

    let controllerIndex = userInfo!["controller"] as! Int

    let rootController =
		WKExtension.sharedExtension().rootInterfaceController
			as! InterfaceController
    rootController.popToRootController()

    rootController.displayDetailScene(controllerIndex)
}
The code in the handleUserActivity method extracts the index value from the userInfo dictionary, obtains a reference to the root interface controller instance and calls the previously added displayDetailScene method on that object passing through the index value as an argument.
Run the WatchKit app once again on the Simulator, this time selecting a different row from the table. Run the glance and tap the screen to launch the WatchKit app. This time, the WatchKit app should launch and display the previously selected detail scene.
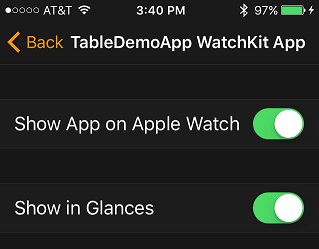
Having verified that the code works within the Simulator, install and run the app on a physical Apple Watch device. Once the table appears, select a row and then press the Digital Crown twice to exit the app and display the time. Perform an upward swiping motion on the screen to display the glances and navigate to the table demo glance scene where the title and time should match the row selected in the main WatchKit app. Tapping the glance scene should launch the WatchKit app and automatically navigate to the corresponding detail scene. If the glance for TableDemoApp does not appear among the glance pages, launch the Watch App on the iPhone and, on the My Watch screen, scroll down to and select the TableDemoApp entry. On the resulting settings screen (Figure 15-10), enable the Show in Glances option:
Figure 15-10
Summary
Glances provide a quick way for users to view key information contained within a WatchKit app. This chapter has added a glance scene to the TableDemoApp project, using app group user defaults and context data to pass data back and forth between the glance and the WatchKit app.
| Purchase the full edition of this watchOS 2 App Development Essentials book in eBook ($12.99) or Print ($27.99) format watchOS 2 App Development Essentials Print and eBook (ePub/PDF/Kindle) editions contain 35 chapters. |
| Previous | Table of Contents | Next |
| An Overview of watchOS 2 WatchKit Glances | A watchOS 2 WatchKit Context Menu Tutorial |
