A watchOS 2 WatchKit Audio Recording and Playback Example
| Previous | Table of Contents | Next |
| Playing Movies and Audio on watchOS 2 using the WKInterfaceMovie Class | An Overview of ClockKit and Apple Watch Complications |
| Purchase the full edition of this watchOS 2 App Development Essentials book in eBook ($12.99) or Print ($27.99) format watchOS 2 App Development Essentials Print and eBook (ePub/PDF/Kindle) editions contain 35 chapters. |
Another new feature introduced into watchOS 2 is the ability to record audio via the Apple Watch device. This involves the use of the audio recording controller which can be configured with a variety of options including audio recording quality and the maximum duration of the recording session.
This chapter will introduce the audio recording controller and implement an example audio recording and playback WatchKit app.
The Audio Recording Controller
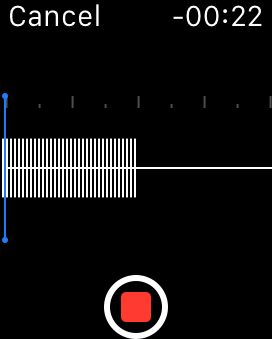
The audio recording controller is launched using a call to the presentAudioRecorderControllerWithOutputURL method of the WKInterfaceController class and, when launched, presents the user with the user interface shown in Figure 27-1:
Figure 27-1
To start recording, the user simply taps the red record button and then is able to monitor the recording level using the graph. If a maximum recording duration has been specified, a countdown time appears in the top right hand corner of the scene. Recording is stopped when the specified duration is reached, by tapping the record button a second time, or cancelled entirely using the Cancel button in the upper left hand corner.
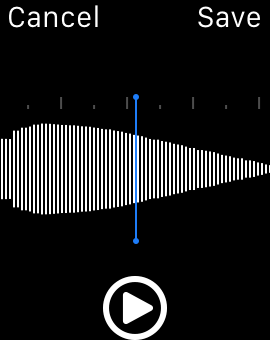
Once the recording has been stopped (as opposed to cancelled) the display changes to provide the user with the option of playing back the recorded audio (Figure 27 2). Options are also provided to cancel the recorded audio without saving, or to save the audio. The text displayed on the save button is configured via an option passed through to the presentAudioRecorderControllerWithOutputURL method. By default, this button displays text which reads “Save”.
Figure 27-2
If the user selects the save button the audio is saved to the file referenced by the URL passed to the method call. If the URL references a .wav file the audio is saved in LPCM format. If any other file extension is used, the audio will be saved in ACC format.
Launching the Audio Recording Controller
The audio recording controller is launched via a call to the presentAudioRecordingControllerWithURL method of the current interface controller instance. This method expects the following parameters when called:
- A URL referencing the audio file into which the recorded content is to be saved.
- An audio recording quality preset value.
- A dictionary object containing options such as the duration of the recording, the title to be displayed on the action button and whether or not the recording should start automatically.
- A completion handler to be called when recording is complete.
The following code, for example, configures recording for 10 seconds using the narrow band speech quality preset with the save button text set to “Store”:
let duration = NSTimeInterval(10)

let recordOptions =
    [WKAudioRecorderControllerOptionsMaximumDurationKey : duration,
     WKAudioRecorderControllerOptionsActionTitleKey: "Store"]

presentAudioRecorderControllerWithOutputURL(saveUrl!,
    preset: .NarrowBandSpeech,
    options: recordOptions as [NSObject : AnyObject],
    completion: { saved, error in
            // Completion handler code here
})
On completion of the recording session, the completion handler is called and passed a Boolean value indicating whether or not the user chose to save the recording and an NSError object. The recording controller supports three audio recording quality presets:
- WKAudioRecordingPreset.NarrowBandSpeech – Recommended for voice recording, this preset uses an 8kHz sampling rate formatted using LPCM or ACC at 128 kbps.
- WKAudioRecordingPreset.WideBandSpeech – Recommended for higher quality speech recording this preset uses a 16kHz sampling rate formatted using LPCM 256 kbps or ACC 24 kbps.
- WKAudioRecordingPreset.HighQualityAudio – The highest quality recording preset, this option uses a 44.1kHz sampling rate formatted using LPCM 705.6 kbps or ACC 96 kbps.
Given the inherent storage capacity restriction of the Apple Watch, the lowest acceptable audio quality preset should be used wherever possible to conserve space.
The full range option keys available to configure the audio recording session are as follows:
- WKAudioRecorderControllerOptionsMaximumDurationKey – Specifies the maximum permitted duration of the recording session.
- WKAudioRecorderControllerOptionsActionTitleKey – The text to be displayed on the action button located in the top right hand corner of the audio recorder controller scene.
- WKAudioRecorderControllerOptionsAlwaysShowActionTitleKey – A Boolean value indicating whether or not the action button is displayed within the controller.
- WKAudioRecorderControllerOptionsAutorecordKey – A Boolean value controlling whether or not the recording starts automatically when the controller is presented to the user.
As discussed in the Sharing Data Between a WatchKit App and the WatchKit Extension chapter, it is important when working with media files to be aware that those files need to be accessible to both the WatchKit app and the corresponding WatchKit extension. When recording audio, the WatchKit app is responsible for storing the recorded audio to file. In terms of playing back the audio, however, the extension will need to be able to reference the saved audio file. When recording or playing back audio, therefore, it is important that an app group shared container be used for the storage of the recorded audio.
The Audio Recording and Playback Tutorial
The remainder of this chapter will work through the creation of a simple WatchKit app designed to record, save and playback audio content using the Apple Watch as both the playback and recording device.
Start Xcode and create a new iOS project. On the template screen choose the Application option located under watchOS in the left hand panel and select iOS App with WatchKit App. Click Next, set the product name to RecordApp, enter your organization identifier and make sure that the Devices menu is set to Universal. Before clicking Next, change the Language menu to Swift and switch off all of the Include options. On the final screen, choose a location in which to store the project files and click on Create to proceed to the main Xcode project window
Designing the Main Storyboard Scene
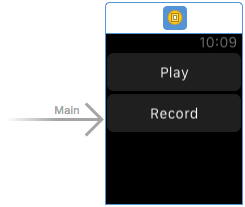
Within the Project Navigator panel select the Interface.storyboard file located under the RecordApp WatchKit App entry. Within Interface Builder, add two Button objects to the main scene and change the text on the buttons to read “Play” and “Record” respectively:
Figure 27-3
Select the Play button, display the Attributes Inspector and switch off the enabled property. The button will only be enabled after a recording has been saved.
Display the Assistant Editor and establish an outlet connection from the Play button named playButton. With the Assistant Editor still displayed, establish action connections from the Play and Record buttons to methods named playAudio and recordAudio respectively.
Creating and Joining the App Group
An app group container will be used to share the media file containing the recorded audio between the WatchKit app and the WatchKit extension. Begin by selecting the RecordApp target located at the top of the Project Navigator panel and, in the Settings panel, select the Capabilities tab and click on the target menu located in the top left hand corner of the panel (highlighted in Figure 27-4):
Figure 27-4
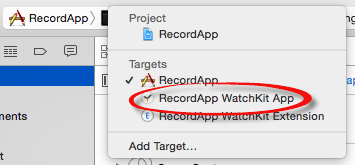
From the target menu (Figure 27-5) select the RecordApp WatchKit App target:
Figure 27-5
| Purchase the full edition of this watchOS 2 App Development Essentials book in eBook ($12.99) or Print ($27.99) format watchOS 2 App Development Essentials Print and eBook (ePub/PDF/Kindle) editions contain 35 chapters. |
To add a new app group to your account, simply click on the + button and enter the new app group name, for example:
group.com.example.RecordApp
Add the current app to the newly added app group by enabling the checkbox next to the group name.
With the WatchKit app added to the app group, the WatchKit extension must also be added as a member of the same group in order to gain access to the shared container. To access the capability settings for the WatchKit extension, use the menu located in the top left-hand corner of the Capabilities panel as indicated in Figure 27-4.
When clicked, this menu will once again present a list of targets contained within the current project, one of which will be the RecordApp WatchKit Extension. Select this option, enable App Group support and select the same app group as that configured for the WatchKit app.
Constructing the Save File URL
If the user chooses to save a recording the file will be saved to the app group shared container. For the purposes of this example, the audio will be saved in a file named audiofile.wav. The code to construct this location now needs to be added to the awakeWithContext method of the InterfaceController.swift file as follows where <YOUR APP GROUP HERE> is replaced by the name assigned to your app group in the previous section:
import WatchKit
import Foundation

class InterfaceController: WKInterfaceController {

    var saveUrl: NSURL?

    @IBOutlet var playButton: WKInterfaceButton!

    override func awakeWithContext(context: AnyObject?) {
        super.awakeWithContext(context)

        let fileManager = NSFileManager.defaultManager()

        let container =
	fileManager.containerURLForSecurityApplicationGroupIdentifier(
		"<YOUR APP GROUP HERE>")

        let fileName = "audioFile.wav"

        saveUrl = container?.URLByAppendingPathComponent(fileName)
    }
.
.
}
Implementing the Recording Code
The code to launch the audio recording controller now needs to be added to the recordAudio action method. Select the InterfaceController.swift file, locate this method and implement the code as follows:
@IBAction func recordAudio() {

    let duration = NSTimeInterval(10)

    let recordOptions =
         [WKAudioRecorderControllerOptionsMaximumDurationKey : duration]

    presentAudioRecorderControllerWithOutputURL(saveUrl!,
         preset: .NarrowBandSpeech,
         options: recordOptions,
         completion: { saved, error in

            if let err = error {
                print(err.description)
            }

            if saved {
                self.playButton.setEnabled(true)
            }
      })
}
The code begins by disabling the Play button and then configures a constant to represent a duration of 10 seconds and adds it to an options dictionary. The audio recording controller is then displayed using the URL created in the awakeWithContext method, the options dictionary and the narrow band speech preset. Finally, the Play button is enabled if the user saved the audio content.
Implementing the Playback Code
The final task is to implement the code in the playAudio method to play back the recorded content. Remaining in the InterfaceController.swift file, locate this method and modify it as follows:
@IBAction func playAudio() {

    let options = [WKMediaPlayerControllerOptionsAutoplayKey : "true"]

    presentMediaPlayerControllerWithURL(saveUrl!, options: options,
		completion: { didPlayToEnd, endTime, error in
            		if let err = error {
                		print(err.description)
            		}
        })
}
The code added to the method uses the presentMediaPlayerControllerWithURL method as described in the previous chapter (Playing Movies and Audio using the WKInterfaceMovie Class) to play back the recorded audio file.
Testing the WatchKit App
Compile and run the WatchKit app on either a physical Apple Watch device or a Simulator session. Record some audio and then use the Play button to play it back. Note that when running on a physical Apple Watch device a request may appear on the paired iPhone seeking permission for the app to use the microphone.
Summary
Along with the introduction of watchOS 2 came the ability to record and playback audio via the Apple Watch device. Recording of audio involves the use of the audio recording controller which presents the user with the controls necessary to record and save audio via the Apple Watch microphone. Options are provided which allow the WatchKit app to designate both the quality of recording and the maximum duration permitted for the session.
| Previous | Table of Contents | Next |
| Playing Movies and Audio on watchOS 2 using the WKInterfaceMovie Class | An Overview of ClockKit and Apple Watch Complications |
