Working with Images in WatchKit
| Previous | Table of Contents | Next |
| A WatchKit Context Menu Tutorial | A WatchKit Animated Image Tutorial |
| Purchase the fully updated watchOS 2/Swift 2 edition of this book in eBook ($12.99) or Print ($27.99) format watchOS 2 App Development Essentials Print and eBook (ePub/PDF/Kindle) editions contain 35 chapters. |
There are a number of factors that need to be taken into consideration when working with images within a WatchKit app such as whether the image can be included within the WatchKit app bundle or needs to be transferred from the iPhone to the Apple Watch device at runtime. Unlike iPhone based apps, the size of the images used within a WatchKit app is also of key importance, particularly when working with large image files.
The goal of this chapter is to explore the various options for managing and displaying images in a WatchKit app including topics such as image caching, named images, animation, image compression, asset catalogs and image templates.
Displaying Images in WatchKit Apps
WatchKit provides two ways in which images can be displayed within a WatchKit app. The first involves the use of the WKInterfaceImage interface object class. When added to the scene of a WatchKit app storyboard, this object can be used to display images to the user. Another option involves setting an image as a background on the WKInterfaceGroup, WKInterfaceButton and WKInterfaceController classes. In both scenarios, the image can be specified within the storyboard file or set dynamically from within the code of the interface controller at runtime.
Wherever possible, images should be in PNG or JPEG format and sized to match the display size of the interface object on which they are to be displayed. Whilst WatchKit is able to handle other image formats, Apple warns that app performance is likely to be impacted adversely when those images are rendered.
Images can be generated and stored within the WatchKit extension or included on the Apple Watch device as part of the WatchKit app bundle.
Images Originating in the WatchKit Extension
Whenever a UIImage object is created within the extension of a WatchKit app, that image is local to the iPhone device. The image contained within a UIImage object in a WatchKit extension can be displayed using the setImage, setImageData, setBackgroundImage and setBackgroundImageData methods of the interface object on which the image is to be displayed. The following code, for example, displays an image stored within a WatchKit extension onto a WKInterfaceImage object via an outlet connection named myImage:
let theImage = UIImage(named: "spaceship")

myImage.setImage(theImage)
At the point that the UIImage object is assigned to an interface object within the scene of a WatchKit app the image must be transmitted wirelessly to the Apple Watch device before it will be visible to user. Depending on the size of the image this transfer can take a considerable amount of time.
To avoid such delays it is important to reduce the storage size of any image objects prior to displaying them within a WatchKit app. In fact, given the storage limitations of the Apple Watch device, this approach should be taken for all images.
An alternative to transferring image files from the iPhone to the watch device is to include image files as part of the WatchKit app bundle so that they are already installed on the watch device at the point that they need to be displayed to the user. Such images are referred to as named images.
Understanding Named Images
As previously outlined, whenever a UIImage object is created within the extension of a WatchKit app, that image is local to the iPhone device and must be transferred to the watch device before it can be displayed to the user. Images that are bundled with the WatchKit app are referred to as named images and are displayed using the setImageNamed and setBackgroundImageNamed methods of the interface objects on which the image is to be displayed. The following code, for example, displays a named image as the background for a WKInterfaceGroup object instance:
myGroup.setBackgroundImageNamed("spaceship")
Adding Images to a WatchKit App
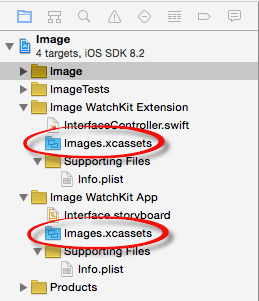
Images can be stored as part of the WatchKit app bundle or WatchKit extension by placing them in the target’s Images.xcassets asset catalog. Figure 21-1, for example, highlights the image assets catalogs for WatchKit app and WatchKit extension targets within the Xcode project navigator panel:
Figure 21-1
When files are stored into the image asset catalog the file names should end with “@2x”, for example [email protected]. This indicates to the asset catalog that the images are suitable for display on the retina screen of the Apple Watch device family. For the purposes of an example, assume that we have a file named [email protected] and need to add this as a named image to the WatchKit app bundle image asset catalog. The first step would be to select the Image.xcassets catalog entry in the WatchKit app target as shown in Figure 21-2:
Figure 21-2
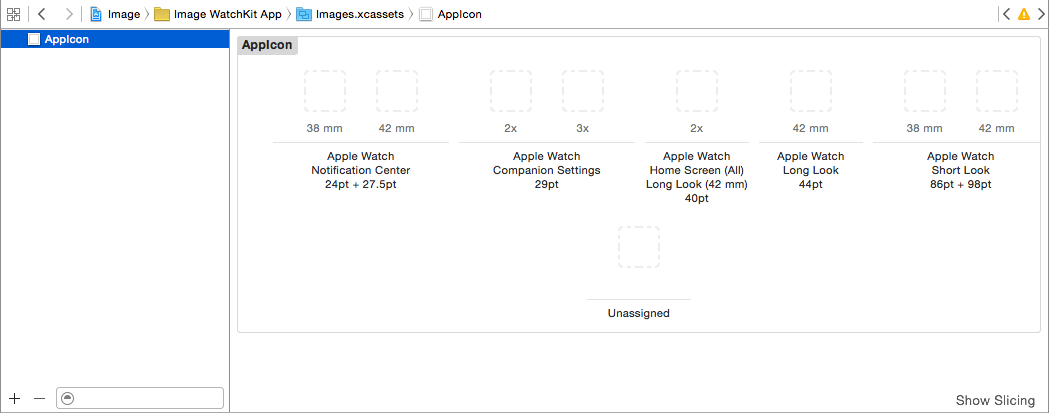
Making this selection will load the catalog into the main Xcode panel:
Figure 21-3
The left hand panel lists the image sets that are currently contained within the catalog. An image set collects together images in different sizes and resolutions. By default, the image asset catalog for a WatchKit app target contains a single image set named AppIcon. As the name suggests, this image set contains the icon used to represent the WatchKit app in a variety of locations such as the home screen and notification center.
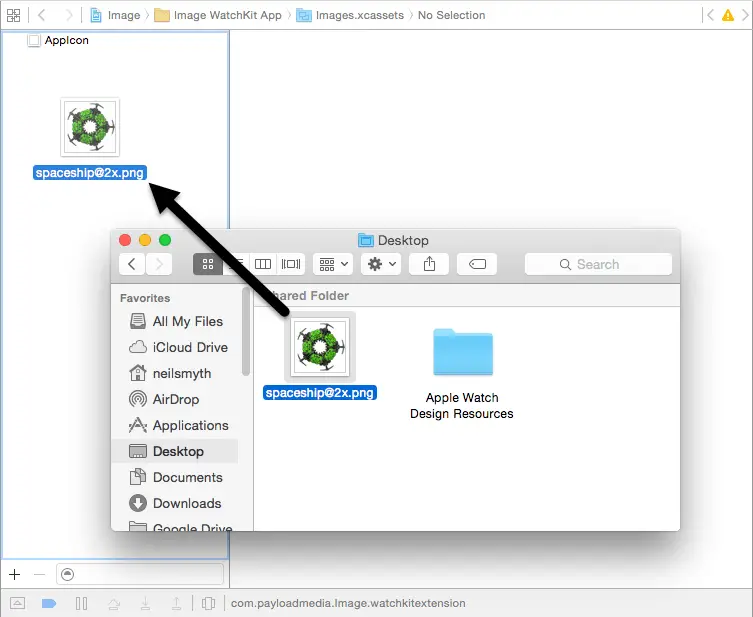
To create a new image set for an image, simply locate the image in a Finder window and drag and drop it onto the image set panel as illustrated in Figure 21-4:
Figure 21-4
Multiple images may be imported by Ctrl-clicking within the image set panel, selecting the Import… menu option and navigating to the file system location containing the image files. If a folder is selected for import, all of the images in that folder will be imported into a single image set with a name reflecting that of the selected folder.
Once the image has been added, a new image set will be listed containing the 2x image. If this were an image set for an iOS app it would also be recommended to add 1x (for non-retina screens) and 3x (for iPhone 6 Plus and iPad devices) images to the image set. Since the Apple Watch has retina-only displays of similar sizes only the 2x image is required:
Figure 21-5
When referencing an image stored in an asset catalog, the “@2x” is dropped from the filename. With the image file named [email protected] contained in an image asset catalog for a WatchKit app target, the code to display this image on a WKInterfaceImage object would read as follows:
myImage.setImageNamed("spaceship")
Caching Extension-based Images on the Watch Device
As previously discussed, images either reside on the Apple Watch device or originate within the WatchKit extension and reside on the paired iPhone device. Images that reside on the iPhone device must be transferred to the watch device before they can be displayed to the user. This problem can be alleviated to a certain extent by bundling images as named images as part of the WatchKit app bundle. Situations may arise, however, where the images to be displayed are not known until app runtime such as when the image is selected or created dynamically within the WatchKit extension based on user activity. In this case, there is no option but to transfer the images to the device as the app is running. The impact of the transfer of images can be reduced by caching them on the watch prior to the point at which the images are needed.
Images can be cached onto the paired Apple Watch using the addCachedImage and addCachedImageWithData methods of the WKInterfaceDevice object. Each WatchKit app has 5MB of cache space available so caching should be used sparingly. When the cache for an app is exhausted, images must be removed using the removeCachedImageWithName or removeAllCachedImages methods of the WKInterfaceDevice object.
Once an image has been cached it is considered to be a named image and may be displayed using the standard named image methods. Once an image has been cached it will remain on the device until it is explicitly removed.
Compressing Large Images
Whilst caching is a useful way to store on the watch device frequently used images that originate in the WatchKit extension this still does not address the issue that it can take a considerable amount of time to transfer a large image from the iPhone to the Apple Watch. Consider a scenario in which the extension for a WatchKit app needs to display a photo that the user has taken using the iPhone camera. Transferring such an image could take over two minutes to transfer wirelessly from the iPhone to the watch. This is clearly an unacceptable amount of time to keep the user waiting.
In reality the image that is taken by the iPhone camera is orders of magnitude larger than is necessary to fit on the display of an Apple Watch. In fact, an image from the iPhone camera roll is measured in thousands of pixels while the display of even the largest Apple Watch model has a resolution of only 312 x 390 pixels. Clearly there is significant opportunity for reducing the size of any large images before they are transferred to the Apple Watch for display.
There are a number of options for reducing the size of any images both in terms of dimensions and storage space before the transfer to the watch takes place. The following code, for example, is useful for reducing the size of an image by a specified scale factor:
if let largeImage = UIImage(named: "myLargeImage") {

    let imageSize = largeImage.size
    let scale: CGFloat = 0.15 // Scale factor

    let reducedSize = CGSizeMake(imageSize.width * scale,
		imageSize.height * scale);

    UIGraphicsBeginImageContext(reducedSize)

    largeImage.drawInRect(CGRectMake(0, 0, reducedSize.width,
		reducedSize.height))

    let compressedImage = UIGraphicsGetImageFromCurrentImageContext()

    UIGraphicsEndImageContext()
    myImage.setImage(compressedImage) // Display the image
}
In tests on an original PNG image file of 2448 x 3264 pixels with a size of 23MB the transfer time was reduced from approximately 3 minutes down to just 6 seconds after the image was compressed using the above code.
| Purchase the fully updated watchOS 2/Swift 2 edition of this book in eBook ($12.99) or Print ($27.99) format watchOS 2 App Development Essentials Print and eBook (ePub/PDF/Kindle) editions contain 35 chapters. |
Specifying the WKInterfaceImage Object Dimensions in Code
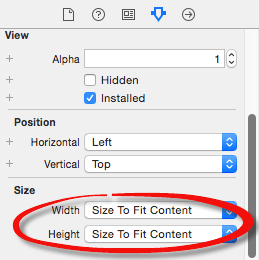
When a WKInterfaceImage interface object is added to a storyboard scene using Interface Builder the dimensions of the object can be specified from within the Attributes Inspector panel (Figure 21 6). Options are available to allow the object to resize to accommodate the assigned image content, to size relative to the container in which the interface object is located, or to specify fixed height and width dimensions:
Figure 21-6
| Purchase the fully updated watchOS 2/Swift 2 edition of this book in eBook ($12.99) or Print ($27.99) format watchOS 2 App Development Essentials Print and eBook (ePub/PDF/Kindle) editions contain 35 chapters. |
myImage.setHeight(100)
myImage.setWidth(170)
Displaying Animated Images
The WKInterfaceImage interface object is able to display animated images. This animation takes the form of a sequence of images with each image representing a single frame of the animation. To create an animation sequence, the image files should be added to the project (preferably bundled with the WatchKit app as named images) using a file naming convention of name<sequence number>.png (for example animation0.png, animation1.png, animation2.png and so on).
The way in which the sequence of animation images is converted into a single animation image and displayed to the user depends on whether the images are bundled with the WatchKit app as named images (the recommended approach for better performance), or reside on the iPhone as part of the extension.
If the animation images are bundled as named images within the WatchKit app, the animated image can be created and displayed using the setImageNamed method of the WKInterfaceImage instance, passing through the image file name prefix. Assuming a set of animation images named animation<image number>.png bundled with the WatchKit app, the animation would be displayed on a WKInterfaceImage instance with a single line of code as follows: myImage.setImageNamed("animation")
When executed, the above method call collects together all of the appropriately named animation sequence images and uses them to create a single animated UIImage object which is then displayed on the corresponding WKInterfaceImage object.
In the case of extension-based animation images, an animated UIImage object must first be created using the animatedImageNamed method of the UIImage class which is then assigned to the WKInterfaceImage object via the object’s setImage method. For example:
let animatedImage = UIImage.animatedImageNamed("animation",
		duration: 20)

myImage.setImage(animatedImage)
Once the animated image has been displayed, the startAnimating method of the WKInterfaceImage object can be used to begin the animation:
myImage.startAnimating()
The animation may be customized in terms of duration, repetition and the range of images used within the animation sequence using the startAnimatingWithImagesInRange method. The following code customizes an animation to use images from positions 1 through 4 of the image sequence with a 6 second duration and 2 repetitions:
myImage.startAnimatingWithImagesInRange(NSRange(location: 1,
			length: 4), duration: 6, repeatCount: 2)
An animation sequence may be stopped at any time via a call to the stopAnimating method:
myImage.stopAnimating()
The implementation of animation within a WatchKit app will be covered in greater detail in the next chapter entitled A WatchKit Animated Image Tutorial.
Template Images and Tinting
Images contained within an image asset catalog may be designated as a template images. When an image is configured as a template image all color information in the image is ignored and the graphic displayed is defined by the stencil that is created by the transparent areas of the image in relation to the non-transparent areas. In Figure 21-7, for example, the rocket image is drawn against a transparent background:
Figure 21-7
When configured as a template image, the colored, non-transparent area of the image is filled with a solid color (light blue by default) creating the stencil image shown in Figure 21 8:
Figure 21-8
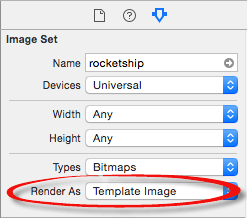
To specify that an image is to be rendered as a template, select the image in the asset catalog, display the Attributes Inspector panel and change the Render As menu to Template Image:
Figure 21-9
The default blue color used for the solid area of the image can be defined within Interface Builder by selecting the interface object on which the image is to be displayed and changing the Tint color setting. A tint color may also be assigned from within the interface controller code using the setTintColor method of the interface object, for example:
myImage.setTintColor(UIColor.redColor())
Summary
Images can be displayed within a WatchKit app scene either using an instance of the WKInterfaceImage class, or as a background image for WKInterfaceButton and WKInterfaceGroup classes. When images originate within the WatchKit extension they will be transferred wirelessly to the watch device before they are displayed to the user causing a time delay for larger images. This can be avoided by reducing image sizes or by including images as part of the WatchKit app bundle. Images included in the WatchKit app bundle are pre-installed in the Apple Watch device along with the app and are referred to as named images. As an alternative to named images, extension based images may be cached on the device so that they remain there for future app invocations.
In addition to static images, WatchKit also provides support for animated images, an example of which will be demonstrated in the next chapter.
| Purchase the fully updated watchOS 2/Swift 2 edition of this book in eBook ($12.99) or Print ($27.99) format watchOS 2 App Development Essentials Print and eBook (ePub/PDF/Kindle) editions contain 35 chapters. |
| Previous | Table of Contents | Next |
| A WatchKit Context Menu Tutorial | A WatchKit Animated Image Tutorial |
