In the previous chapter, we looked at ports and services on an Ubuntu system. We also briefly looked at iptables firewall rules on Ubuntu, including the creation of a few very simple rules from the command line. In this chapter, we will look at a more user-friendly approach to iptables configuration using two tools named gufw and ufw. As we will see, gufw and ufw provide a high level of control over both inbound and outbound network traffic and connections without the need to understand the lower-level iptables syntax.
An Overview of gufw and ufw
Included with Ubuntu is a package called ufw which is an acronym for Uncomplicated Firewall. This package provides a command line interface for managing and configuring rules for the Netfilter iptables-based firewall. The gufw tool provides a user-friendly graphical interface to ufw designed to make firewall management possible without the need to issue ufw commands at the command line.
Installing gufw on Ubuntu
Whilst ufw is installed on Ubuntu by default, the gufw package is not. To install gufw, therefore, open a Terminal window (Ctrl-Alt-T) and enter the following command at the resulting prompt:
# apt install gufwCode language: plaintext (plaintext)Running and Enabling gufw
Once installed, launch gufw by pressing Alt-F2 within the GNOME desktop and entering gufw into the Run a command text box. When invoked for the first time, it is likely that the firewall will be disabled, as illustrated in Figure 15-1.
To enable the firewall, move the Status switch (A) to the on position. By default, the main panel (D) will be displaying the gufw home page containing some basic information about the tool. Selecting options from the row of buttons (C) will change the information displayed in the panel. For example, select the Rules button to add, remove and view rules.
 |
You are reading a sample chapter from Ubuntu 22.04 Essentials. Buy the full book now in eBook ($24.99) format. Includes 36 chapters. Learn more. |
The gufw tool is provided with a small set of pre-configured profiles for work, home, and public environments. To change the profile and view the settings, simply select the profile from the menu (B). To modify an existing profile, select it from the menu and use the Incoming and Outgoing menus to change the selections. To configure specific rules, display the Rules screen and add, remove, and modify rules as required. These will then be applied to the currently selected profile.
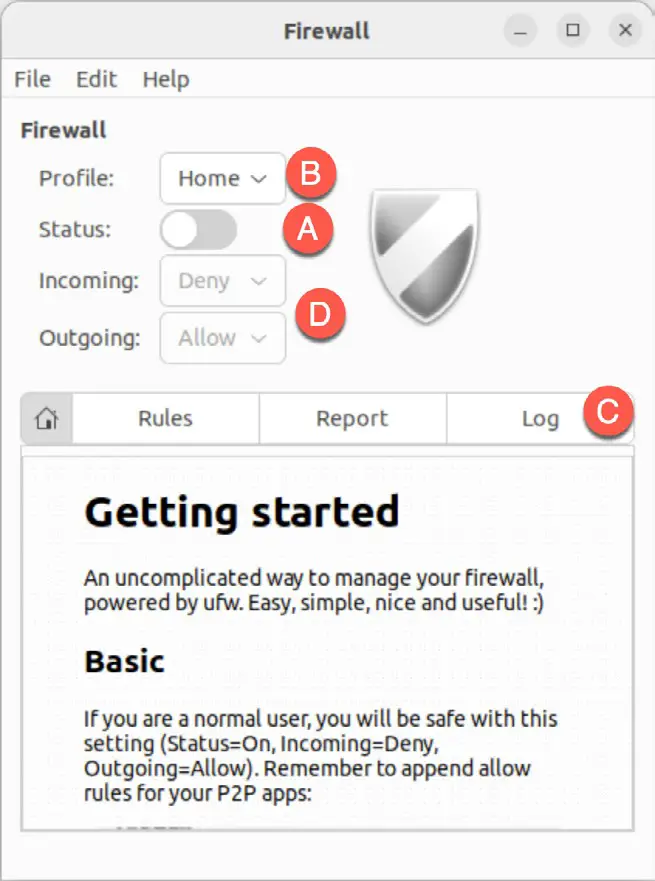
The currently selected profile dictates how the firewall handles traffic in the absence of any specific policy rules. By default, the Home profile, for example, is configured to deny all incoming traffic and allow all outgoing traffic. These default policy settings are changed using the Incoming: and Outgoing: menus (E).
Exceptions to the default policy are defined through the creation of additional rules. With the Home profile denying incoming traffic, for example, rules would need to be added to enable certain acceptable types of incoming connections. Such rules are referred to in the security community as a whitelist.
If, on the other hand, the incoming policy was changed to Allow all traffic, then all incoming traffic would be permitted unless rules were created for specific types of connections that must be blocked. These rules, unsurprisingly, are referred to as a blacklist. The blacklist/whitelist approach applies equally to incoming and outgoing connections.
Creating a New Profile
While it is possible to modify the pre-defined profiles, it will typically make more sense to create one or more profiles to configure the firewall for your specific needs. New profiles are created by selecting the Edit -> Preferences… menu option to display the dialog shown in Figure 15-2:
 |
You are reading a sample chapter from Ubuntu 22.04 Essentials. Buy the full book now in eBook ($24.99) format. Includes 36 chapters. Learn more. |
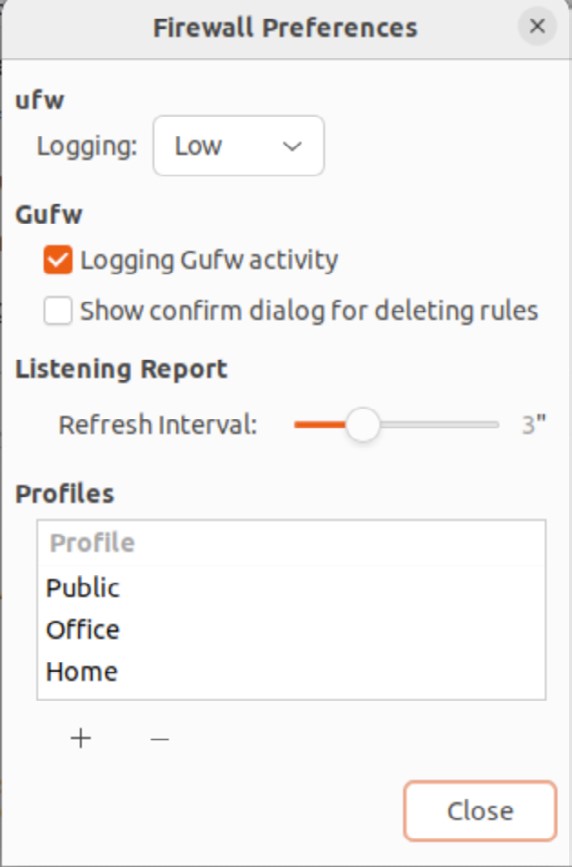
To add a new profile, click on the ‘+’ button located beneath the list of profiles. A new profile named Profile 1 will appear in the list. To give the profile a more descriptive name, double-click on the entry to enter edit mode and enter a new name:
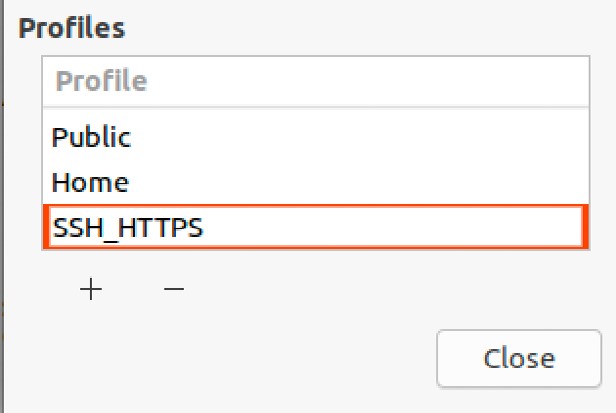
Once the profile has been created and named, click on the Close button to return to the main screen, select it from the Profile menu and turn on the Status switch:
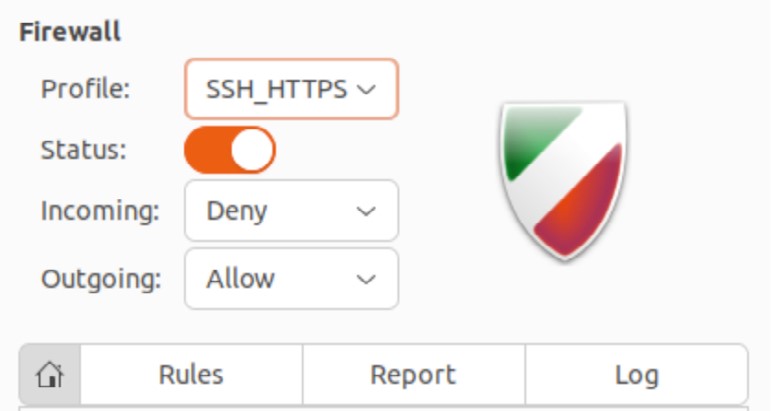
With the custom profile selected, it is ready to set up some custom rules that override the default incoming and outgoing settings.
Adding Preconfigured Firewall Rules
New rules are created by clicking on the Rules button followed by the + button located at the bottom of the rules panel, as highlighted in Figure 15-5:
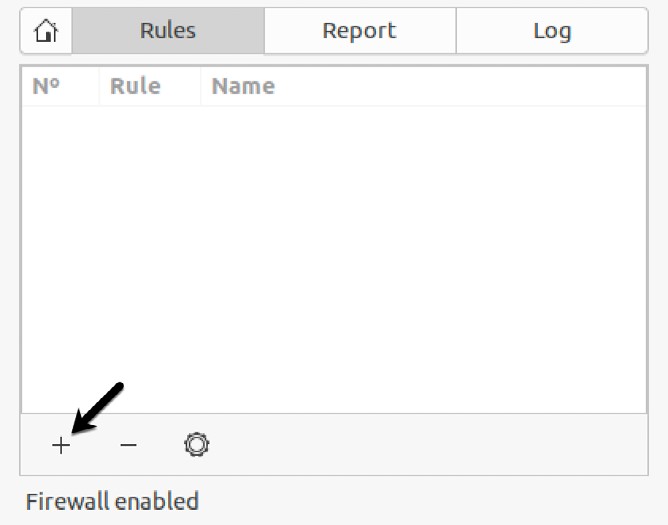
Once selected, the dialog shown in Figure 15-6 will appear with the Preconfigured tab selected.
 |
You are reading a sample chapter from Ubuntu 22.04 Essentials. Buy the full book now in eBook ($24.99) format. Includes 36 chapters. Learn more. |
The Preconfigured panel allows rules to be selected that match specific applications and services. For example, traffic from such tools as Skype and BitTorrent may be enabled by selecting the entry from the Application menu and the Policy and Direction menus accordingly to restrict or allow traffic.
To help find a specific application or service, use the Category and Subcategory menus to filter the items that appear in the Application menu. Alternatively, simply enter the application or service name in the Application Filter field to filter the menu items:
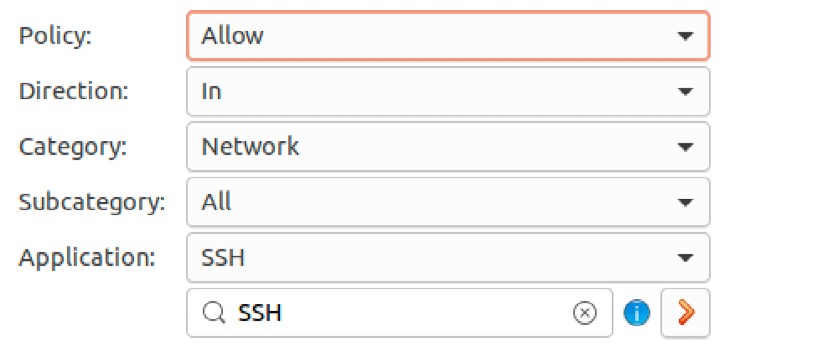
The Policy menu provides the following options for controlling traffic for the selected application or service:
- Allow – Traffic is permitted on the port.
- Deny – Traffic is not permitted on the port. The requesting system is not notified of the denial. The data packet is simply dropped.
- Reject – Traffic is not permitted on the port. The data packet is dropped, and the requesting system is notified of the rejection.
- Limit – Connections are denied if the same IP address has attempted to establish 6 or more connections over a 30-second time frame.
Once a rule has been defined, clicking the Add button will implement the rule, dismiss the Add Rule dialog and the new rule will be listed in the main screen of the gufw tool (with rules for both IPv4 and IPv6 protocols):
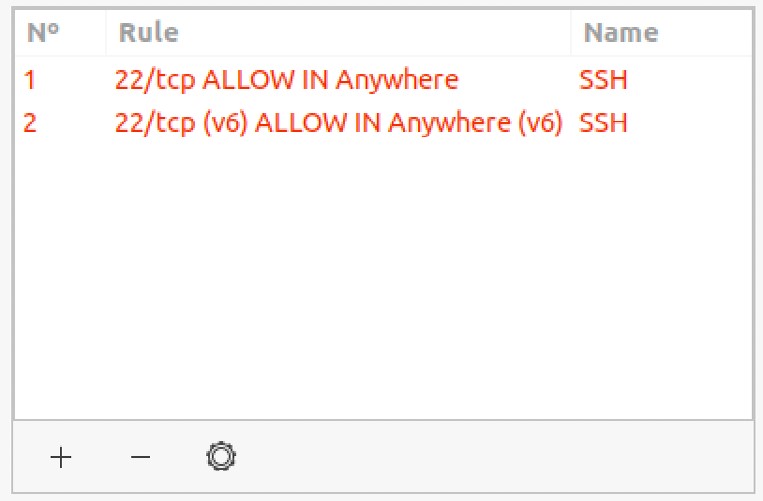
To delete a rule, select it within the list and click on the ‘-’ button located at the bottom of the dialog. Similarly, edit an existing rule by selecting it and clicking on the gear button to the right of the ‘-’ button.
 |
You are reading a sample chapter from Ubuntu 22.04 Essentials. Buy the full book now in eBook ($24.99) format. Includes 36 chapters. Learn more. |
Adding Simple Firewall Rules
Whereas preconfigured rules allow the firewall to be configured based on well known services and applications, the Simple tab of the Add Rule dialog allows incoming and outgoing rules to be defined simply by referencing the corresponding TCP/IP port. The ports used by known applications and services represent only a small subset of the ports available for use by applications and for which firewall rules may need to be defined. A third-party application might, for example, use port 5700 to communicate with a remote server. That being the case, it may be necessary to allow traffic on this specific port using the Simple panel:
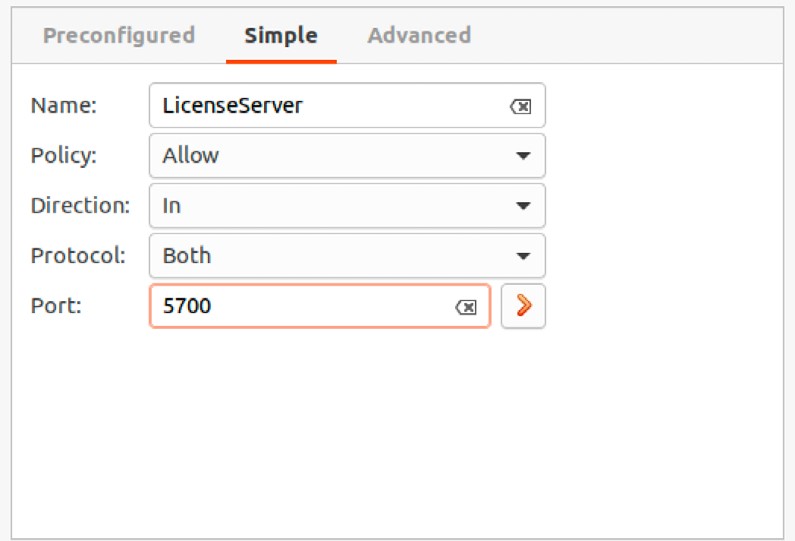
The rule may be configured to filter either TCP, UDP or both traffic types. In addition, the port may be specified as a single port number or as a range of ports with the start and end ports separated by a colon (1000:1500, for example, would apply the rule to all ports between 1000 and 1500). Alternatively, enter the name of the service associated with the port (for example, https or ssh)
Adding Advanced Rules
So far, we have looked at rules to control only the type of traffic to block (incoming traffic on port 22, for example) regardless of the source or destination of the traffic. It is often the case, however, that rules will need to be defined to allow or deny traffic based on an IP address or range of IP addresses.
For the purposes of an example, assume that the local system has an IP address of 192.168.0.102. The firewall may be configured to only allow access on port 22 from a system with the IP address of, for example, 192.168.0.105. To achieve this, the From: field of the Advanced settings panel should be set to the IP address of the system from which the connection request is originating (in this case 192.168.0.105).
The To: fields provide the option to specify the IP address and port of the system to which the connection is being made. In this example, this would be port 22 on the local system (192.168.0.102). The To: IP address is actually optional and may be left blank:
 |
You are reading a sample chapter from Ubuntu 22.04 Essentials. Buy the full book now in eBook ($24.99) format. Includes 36 chapters. Learn more. |
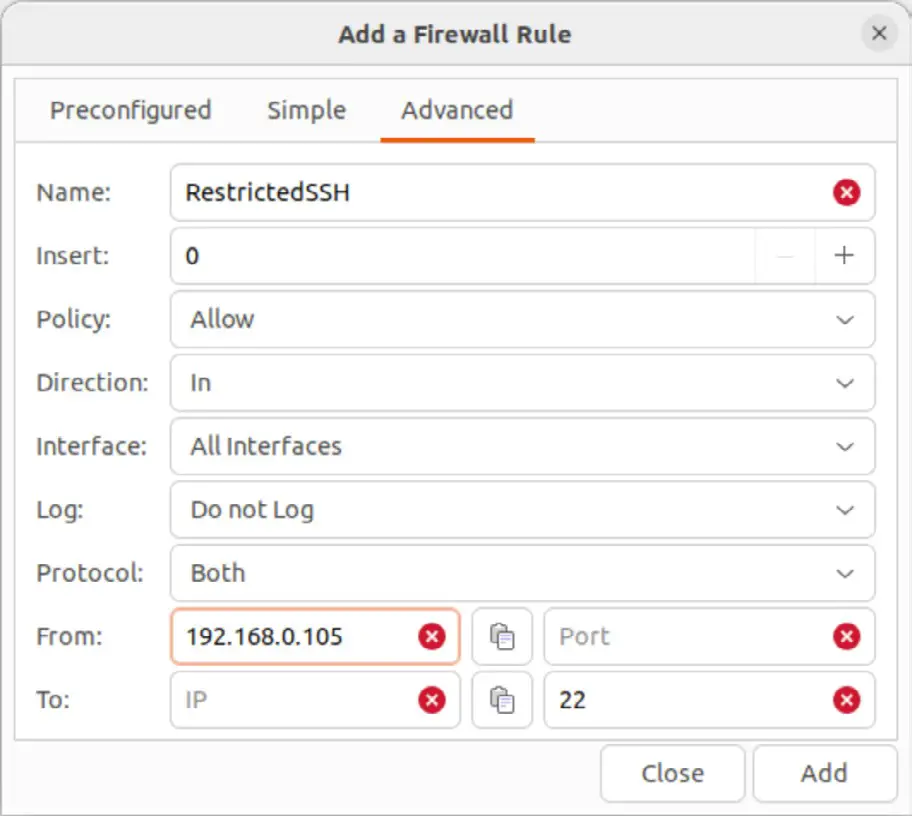
Assuming that the incoming default policy is still set to Deny or Reject on the main screen, the above rule will allow SSH access via port 22 to the local system only from the remote system with the IP address of 192.168.0.105. SSH access attempts from systems with other IP addresses will fail. Note that if the target system is the local system the To: IP address field may be left blank. The Insert field in the above dialog allows the new rule to be inserted at the specified position in the list of existing rules, thereby allowing you to control the order in which the rules are applied within the firewall.
It is also possible to specify a range of addresses by using the IP address bitmask. For example, to create a rule for a range of IP addresses from 192.168.0.1 to 192.168.0.255 the IP address should be entered into the From: field as 192.168.0.0/24.
Similarly, to specify a rule covering IP address range 192.168.0.1 to 192.168.0.30, a bitmask of 27 would be used, i.e. 192.168.0.0/27.
A useful calculator for identifying the address range covered by each bit mask value is available online at http://subnet-calculator.com.
Configuring the Firewall from the Command Line using ufw
All of the firewall configuration options available through the graphical gufw tool are also available from the underlying command line using ufw command.
 |
You are reading a sample chapter from Ubuntu 22.04 Essentials. Buy the full book now in eBook ($24.99) format. Includes 36 chapters. Learn more. |
To enable or disable the firewall:
# ufw enable
# ufw disableCode language: PHP (php)
The current status of the firewall may be obtained using the status option:
# ufw status
Status: active

To                         Action      From
--                         ------      ----
22                         ALLOW       192.168.86.30
For more details status information, combine the above command with the verbose option:
# ufw status verbose
Status: active
Logging: on (full)
Default: deny (incoming), allow (outgoing), deny (routed)
New profiles: skip

To                         Action      From
--                         ------      ----
22                         ALLOW IN    192.168.86.30Code language: plaintext (plaintext)
The output in the above example shows that the default policy for the firewall is to deny all incoming and routed connections while allowing all outgoing connections. To change any of these default settings, use the ufw command with the default option using the following syntax:
# ufw default <policy> <direction>Code language: plaintext (plaintext)For example, to enable all incoming connections by default:
# ufw default allow incomingCode language: plaintext (plaintext)To allow or block traffic on a specific port, use the following syntax:
 |
You are reading a sample chapter from Ubuntu 22.04 Essentials. Buy the full book now in eBook ($24.99) format. Includes 36 chapters. Learn more. |
# ufw <policy> <port number>/<optional protocol>Code language: plaintext (plaintext)For example, to allow both TCP and UDP incoming traffic on port 30:
# ufw allow 30Code language: PHP (php)Similarly, to deny incoming TCP traffic on port 5700:
# ufw deny 5700/tcpCode language: plaintext (plaintext)Rules may also be declared by referencing the name of the service corresponding to the port. For example to enable SSH access on port 22:
# ufw allow sshCode language: plaintext (plaintext)As with the gufw tool, ufw also allows access to be controlled from specific external IP addresses. For example, to allow all incoming traffic from IP address 192.168.0.20:
# ufw allow from 192.168.0.20Code language: plaintext (plaintext)To specifically deny traffic from an IP address:
 |
You are reading a sample chapter from Ubuntu 22.04 Essentials. Buy the full book now in eBook ($24.99) format. Includes 36 chapters. Learn more. |
# ufw deny 192.168.0.20Code language: plaintext (plaintext)To limit access for IP address 192.168.0.20 to only port 22:
# ufw allow from 192.168.0.22 to any port 22Code language: plaintext (plaintext)To further restrict access for the IP address to only TCP packets, use the following syntax:
# ufw allow from 192.168.0.20 to any port 22 proto tcpCode language: plaintext (plaintext)The position of a new rule within the list of existing rules may be declared using the insert option. For example to create a new rule and insert it at position 3 in the rules list:
# ufw insert 3 allow from 192.168.0.123 to any port 2 Code language: plaintext (plaintext)To display the list of rules with associated numbers:
# ufw status numbered
Status: active

     To                         Action      From
     --                         ------      ----
[ 1] 22                         ALLOW IN    192.168.86.30
[ 2] 30                         ALLOW IN    Anywhere
[ 3] 22                         ALLOW IN    192.168.0.123
[ 4] 5700/tcp                   DENY IN     Anywhere
[ 5] 22/tcp                     ALLOW IN    Anywhere
[ 6] Anywhere                   ALLOW IN    192.168.0.20
[ 7] 22                         ALLOW IN    192.168.0.4
[ 8] 30 (v6)                    ALLOW IN    Anywhere (v6)
[ 9] 5700/tcp (v6)              DENY IN     Anywhere (v6)
[10] 22/tcp (v6)                ALLOW IN    Anywhere (v6)Code language: plaintext (plaintext)
Having identified the number assigned to a rule, that number may be used to remove the rule from the firewall:
 |
You are reading a sample chapter from Ubuntu 22.04 Essentials. Buy the full book now in eBook ($24.99) format. Includes 36 chapters. Learn more. |
# ufw delete 4Code language: plaintext (plaintext)To obtain a full listing of the capabilities of the ufw tool run the command with the –help argument:
# ufw helpCode language: plaintext (plaintext)Logging of firewall activity can be enabled and disabled using the logging command-line option:
# ufw logging on
# ufw logging offCode language: plaintext (plaintext)
The amount of logging performed by ufw may also be declared, including a low, medium, high, or full setting when turning on logging, for example:
# ufw logging on lowCode language: plaintext (plaintext)The ufw log file can be found at:
/var/log/ufw.logCode language: plaintext (plaintext)Use the reload option to restart the firewall and reload all current settings:
 |
You are reading a sample chapter from Ubuntu 22.04 Essentials. Buy the full book now in eBook ($24.99) format. Includes 36 chapters. Learn more. |
# ufw reloadCode language: plaintext (plaintext)Finally, to reset the firewall to the default settings (thereby removing all existing rules and settings):
# ufw resetCode language: plaintext (plaintext)Summary
Any computer system that is connected to other systems, either via an internal network or through an internet connection should implement some form of firewall to mitigate the risk of attack. The Uncomplicated Firewall provided with Ubuntu provides a simple yet effective firewall that allows basic rules to be defined either using the command-line or the graphical gufw tool. This chapter has outlined the basics of enabling the firewall and configuring firewall rules.

