
In computer security, user authentication falls into three categories: something you know, something you have, and something you are. The “something you know” category typically involves a memorized password or PIN and is considered the least secure option. A more secure option is the “something you have” approach, which usually takes the form of a small authentication token or device which generates one-time access codes on request.
The final category, “something you are,” refers to a physical attribute that is unique to the user. This involves biometrics in the form of a retina scan, facial or voice recognition, or fingerprint.
With the iPhone 5s, Apple introduced a built-in fingerprint scanner that enabled users to access the device and make purchases using fingerprint authentication in the iTunes, App, and iBooks stores. Since the introduction of iOS 8, this biometric authentication capability can now be built into your own apps. In addition, with the introduction of the iPhone X and iOS 11, biometric authentication using facial recognition can also be built into your iOS apps.
The Local Authentication Framework
Biometric authentication for iOS apps is implemented using the Local Authentication Framework. The key class within this framework is the LAContext class which, among other tasks, is used to evaluate the authentication abilities of the device on which the app is running and perform the authentication.
Checking for Biometric Authentication Availability
Not all iOS devices offer fingerprint scanners or facial recognition support, and even on devices with the necessary hardware support, not all users will have activated these authentication features. The first step in using biometric authentication, therefore, is to check that biometric authentication is a viable option on the device:
 |
You are reading a sample chapter from Building iOS 17 Apps using Xcode Storyboards.
Buy the full book now in eBook or Print format. The full book contains 96 chapters and 760 pages of in-depth information. |
let context = LAContext()

var error: NSError?

if context.canEvaluatePolicy(
	LAPolicy.DeviceOwnerAuthenticationWithBiometrics,
		error: &error) {
	// Biometry is available on the device
} else {
	// Biometry is not available on the device
	// No hardware support, or the user has not set up biometric auth
}Code language: Swift (swift)
If biometric authentication is not available, the reason can be identified by accessing the errorCode property of the error parameter and will fall into one of the following categories:
- LAError.biometryNotEnrolled – The user has not enrolled in biometric authentication on the device.
- LAError.passcodeNotSet – The user has not yet configured a passcode on the device.
- LAError.biometryNotAvailable – The device does not have the required biometric hardware support.
Identifying Authentication Options
If the device on which the app is running contains the necessary biometric hardware, it can be useful to identify the supported authentication type. This can be achieved by evaluating the biometryType property of the LAContext instance as follows:
let context = LAContext()

var error: NSError?

if context.canEvaluatePolicy(
    LAPolicy.deviceOwnerAuthenticationWithBiometrics,
         error: &error) {

    if (context.biometryType == LABiometryType.faceID) {
        // Device support Face ID
    } else if context.biometryType == LABiometryType.touchID {
        // Device supports Touch ID
    } else {
        // Device has no biometric support
    }Code language: Swift (swift)
Evaluating Biometric Policy
If biometric authentication is available, the next step is to evaluate the policy. This task is performed by calling the evaluatePolicy method of the LAContext instance, passing through the authentication policy type, and a message to be displayed to the user. The task is performed asynchronously, and a reply closure expression is called once the user has provided input:
context.evaluatePolicy(
	LAPolicy.deviceOwnerAuthenticationWithBiometrics,
	localizedReason: "Authentication is required for access",
	reply: {(success, error) in
		// Code to handle reply here
  })Code language: Swift (swift)
The reply closure expression is passed a Boolean value indicating the success or otherwise of the authentication and an NSError object from which the nature of any failure can be identified via the corresponding error code. Failure to authenticate will fall into one of the following three categories:
- LAError.systemCancel – The authentication process was canceled by the operating system. This error typically occurs when the app is placed in the background.
- LAError.userCancel – The authentication process was canceled by the user.
- LAError.userFallback – The user opted to authenticate using a password instead of Touch or Face ID.
In the event of the user fallback, it is the responsibility of the app to prompt for and verify a password before providing access.
|
You are reading a sample chapter from Building iOS 17 Apps using Xcode Storyboards.
Buy the full book now in eBook or Print format. The full book contains 96 chapters and 760 pages of in-depth information. |
If the authentication process is successful, the app should provide the user access to the protected screens, data, or functionality.
A Biometric Authentication Example Project
Launch Xcode and create a new project using the iOS App template with the Swift and Storyboard options selected, entering BiometricID as the product name.
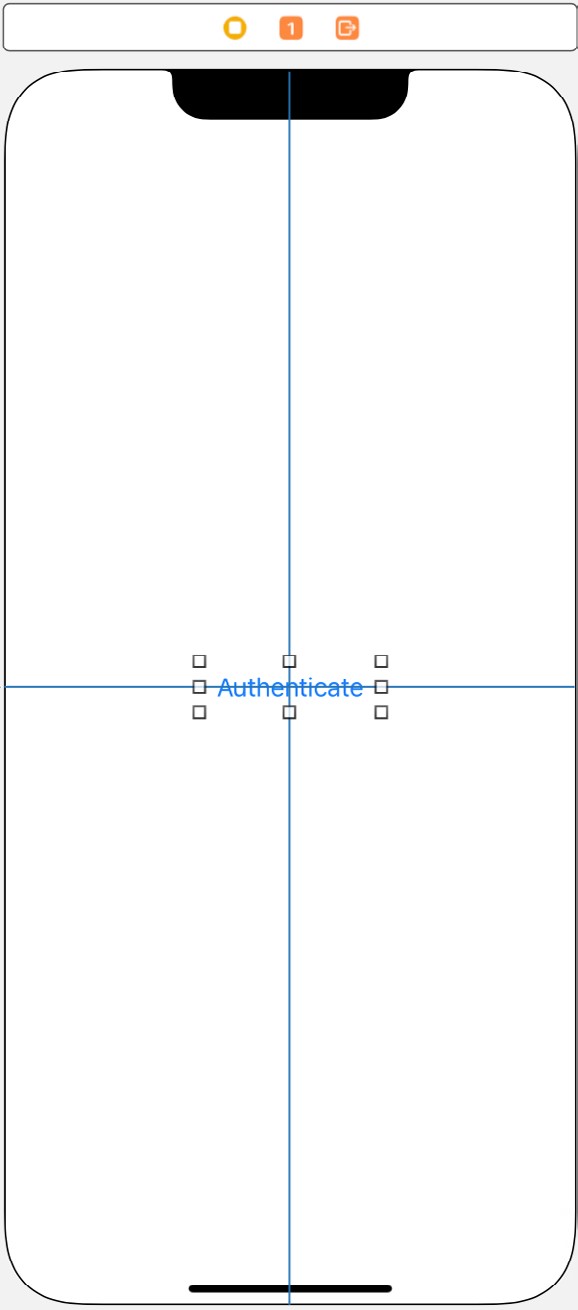
Select the Main.storyboard file, display the Library, and drag and drop a Button view to position it in the center of the storyboard scene. Change the text on the button so that it reads Authenticate.
With the button selected, display the Auto Layout Align menu and configure both horizontal and vertical centers in container constraints.
Display the Assistant Editor, Ctrl-click on the button view, and drag the resulting line to a point beneath the ViewController class declaration line. On releasing the line, establish a connection to an outlet named authButton.
|
You are reading a sample chapter from Building iOS 17 Apps using Xcode Storyboards.
Buy the full book now in eBook or Print format. The full book contains 96 chapters and 760 pages of in-depth information. |
Finally, Ctrl-click and drag from the button view to a position just beneath the viewDidLoad method in the ViewController.swift file. Release the line and, in the connection dialog, establish an Action connection to a method named authenticateUser.
On completion of the user interface design, the layout should resemble Figure 57-1:
Checking for Biometric Availability
With the user interface design, the next step is to add some code to the authenticateUser method to verify that the device can handle biometric authentication. Select the ViewController.swift file, import the LocalAuthentication Framework, and add code to the authenticateUser method as follows:
import UIKit
import LocalAuthentication

class ViewController: UIViewController {

    override func viewDidLoad() {
        super.viewDidLoad()
        // Do any additional setup after loading the view, typically from a nib.
    }

    @IBAction func authenticateUser(_ sender: Any) {

        let context = LAContext()

        var error: NSError?

        if context.canEvaluatePolicy(
            LAPolicy.deviceOwnerAuthenticationWithBiometrics,
            error: &error) {

            // Device can use biometric authentication

        } else {
            // Device cannot use biometric authentication
            if let err = error {
                switch err.code{

                case LAError.Code.biometryNotEnrolled.rawValue:
                    notifyUser("User is not enrolled",
                           err: err.localizedDescription)

                case LAError.Code.passcodeNotSet.rawValue:
                    notifyUser("A passcode has not been set",
                           err: err.localizedDescription)

                case LAError.Code.biometryNotAvailable.rawValue:
                    notifyUser("Biometric authentication not available",
                           err: err.localizedDescription)
                default:
                    notifyUser("Unknown error",
                           err: err.localizedDescription)
            }
        }
    }
}Code language: Swift (swift)
In addition to evaluating the authentication policy, the above code identifies whether the device supports Face ID or Touch ID authentication and accordingly updates the text displayed on the authButton instance.
Before proceeding, implement the notifyUser method as follows:
|
You are reading a sample chapter from Building iOS 17 Apps using Xcode Storyboards.
Buy the full book now in eBook or Print format. The full book contains 96 chapters and 760 pages of in-depth information. |
func notifyUser(_ msg: String, err: String?) {
    let alert = UIAlertController(title: msg,
		message: err,
		preferredStyle: .alert)

    let cancelAction = UIAlertAction(title: "OK",
		style: .cancel, handler: nil)

    alert.addAction(cancelAction)

    self.present(alert, animated: true,
                        completion: nil)
}Code language: Swift (swift)
Seeking Biometric Authentication
The next task is to attempt to obtain authentication from the user. This involves a call to the evaluatePolicy method of the local authentication context:
@IBAction func authenticateUser(_ sender: Any) {

    let context = LAContext()

    var error: NSError?

    if context.canEvaluatePolicy(
        LAPolicy.deviceOwnerAuthenticationWithBiometrics,
        error: &error) {

        // Device can use biometric authentication
        context.evaluatePolicy(
            LAPolicy.deviceOwnerAuthenticationWithBiometrics,
            localizedReason: "Access requires authentication",
            reply: {(success, error) in
                DispatchQueue.main.async {

                    if let err = error {

                        switch err._code {

                        case LAError.Code.systemCancel.rawValue:
                            self.notifyUser("Session canceled",
                                            err: err.localizedDescription)

                        case LAError.Code.userCancel.rawValue:
                            self.notifyUser("Please try again",
                                            err: err.localizedDescription)

                        case LAError.Code.userFallback.rawValue:
                            self.notifyUser("Authentication",
                                            err: "Password option selected")
                            // Custom code to obtain password here

                        default:
                            self.notifyUser("Authentication failed",
                                            err: err.localizedDescription)
                        }

                    } else {
                        self.notifyUser("Authentication Successful",
                                        err: "You now have full access")
                    }
                }
        })

    } else {
        // Device cannot use biometric authentication
        if let err = error {
            switch err.code {

            case LAError.Code.biometryNotEnrolled.rawValue:
                notifyUser("User is not enrolled",
                           err: err.localizedDescription)

            case LAError.Code.passcodeNotSet.rawValue:
                notifyUser("A passcode has not been set",
                           err: err.localizedDescription)


            case LAError.Code.biometryNotAvailable.rawValue:
                notifyUser("Biometric authentication not available",
                           err: err.localizedDescription)
            default:
                notifyUser("Unknown error",
                           err: err.localizedDescription)
            }
        }
    }
}Code language: Swift (swift)
The code added to the method initiates the authentication process and displays a message confirming a successful authentication. In the event of an authentication failure, a message is displayed to the user indicating the reason for the failure. The selection of the password option simply confirms that the option was selected. The action taken in this situation will be app specific but will likely involve prompting for a password and verifying it against a database of valid passwords.
Adding the Face ID Privacy Statement
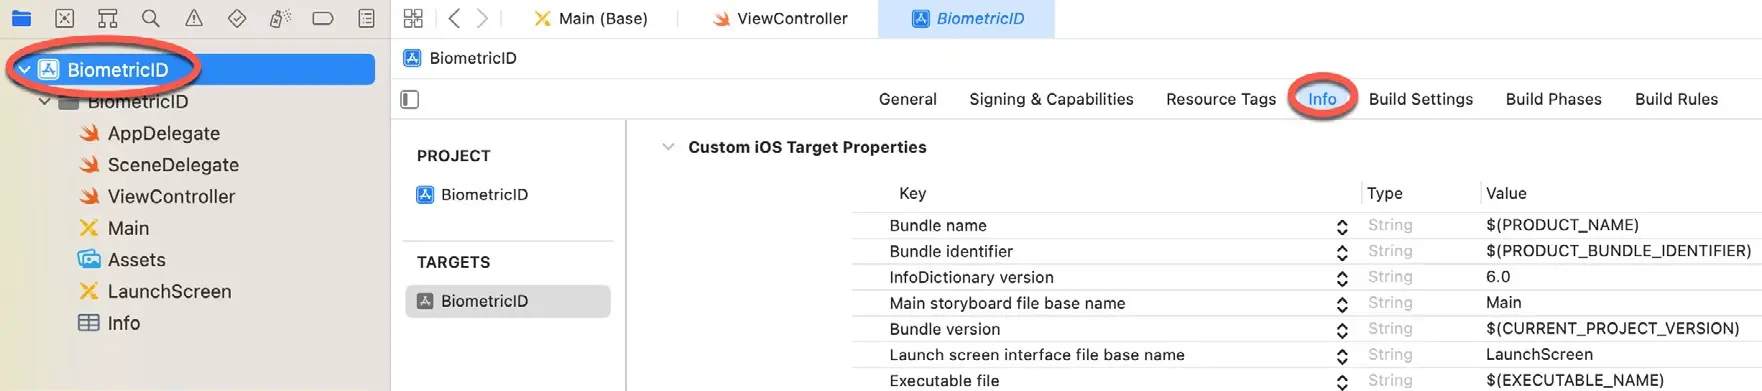
Before testing, the final step is configuring the Face ID privacy statement within the project’s Info.plist file. This is the statement displayed to the user when the app seeks permission to use Face ID authentication. To add this entry, select the BiometricID entry at the top of the Project navigator panel and, in the main panel, select the Info tab as shown in Figure 57-2:
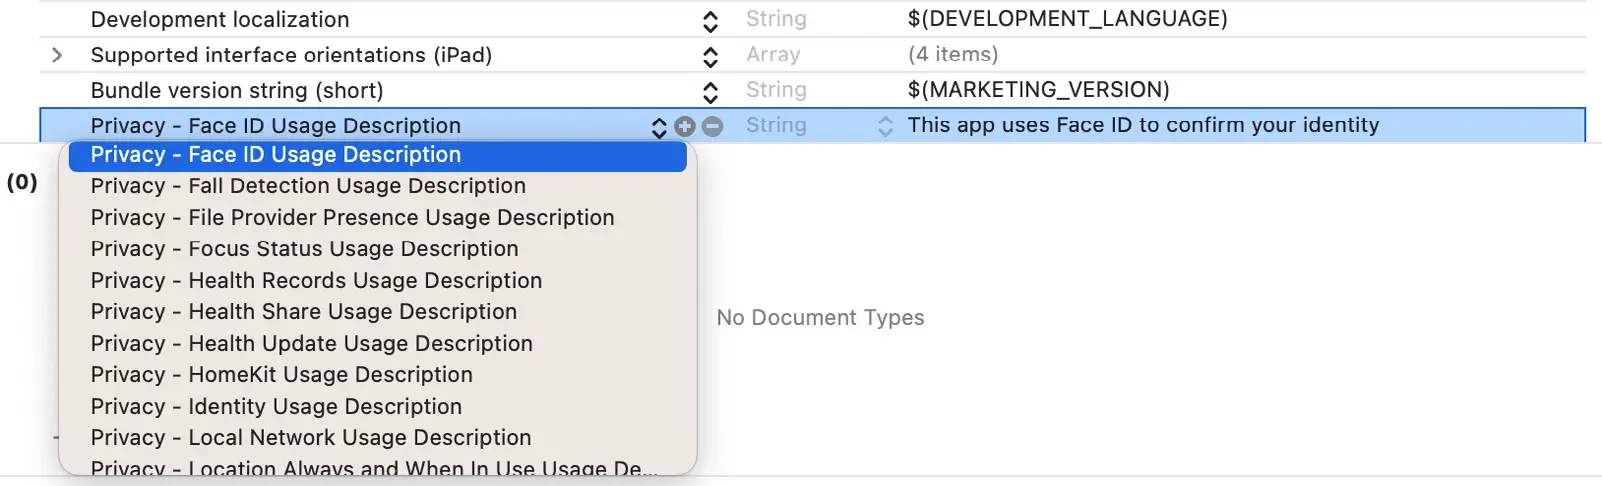
Next, click on the + button contained with the last line of properties in the Custom iOS Target Properties section. Then, from the resulting menu, select the Privacy – Face ID Usage Description option and enter a description into the value field:
Testing the App
Biometric authentication can be tested on physical iOS devices, including biometric support, or using the simulator environment.
|
You are reading a sample chapter from Building iOS 17 Apps using Xcode Storyboards.
Buy the full book now in eBook or Print format. The full book contains 96 chapters and 760 pages of in-depth information. |
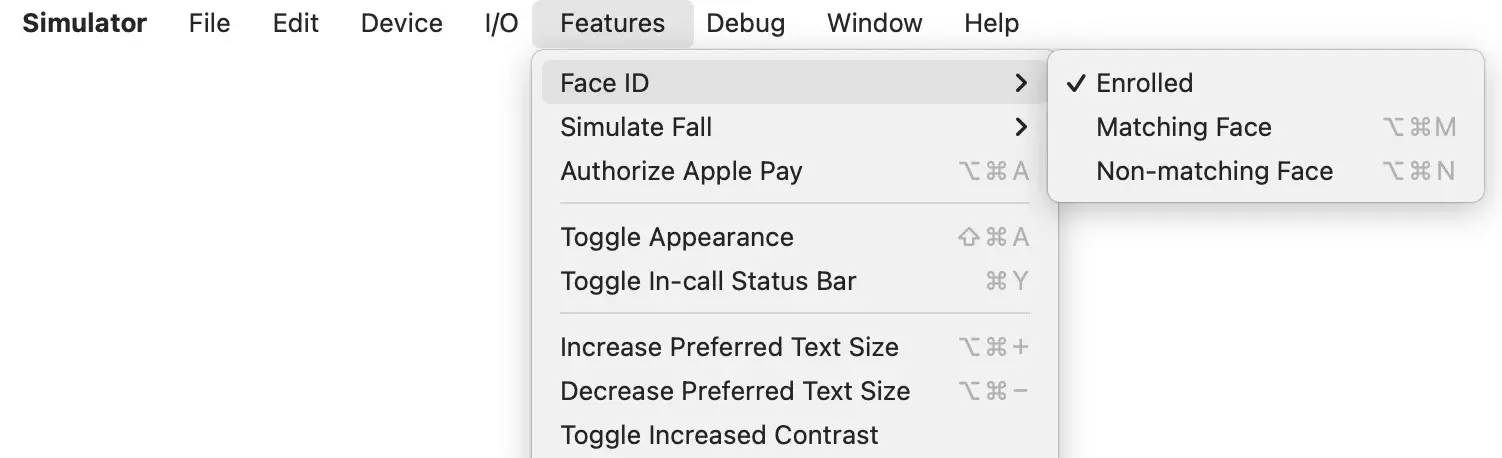
When testing Face ID support on a simulator, compile and run the app on an iPhone 14 or later simulator. Once the app has launched, select the simulator’s Features -> Face ID menu and ensure the Enrolled option is enabled (as highlighted in Figure 57-4) before tapping the Authenticate button within the app.
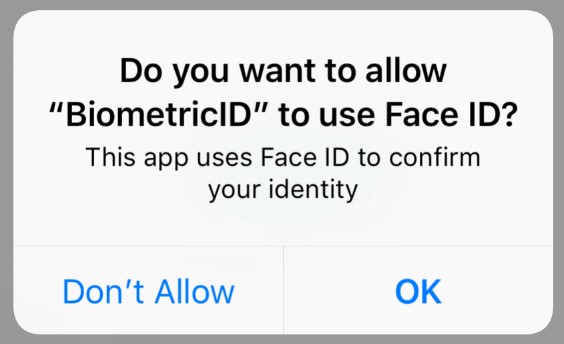
At this point, the Face ID permission request dialog will appear, displaying the privacy statement that was previously entered into the Info screen, as shown in Figure 57-5:
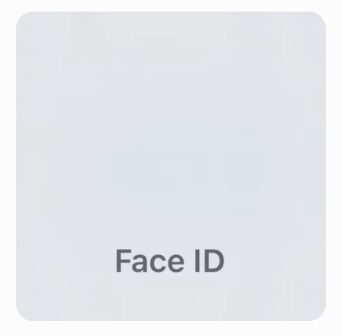
After granting permission by clicking on the OK button, the gray simulated Face ID panel (Figure 57-6) should appear:
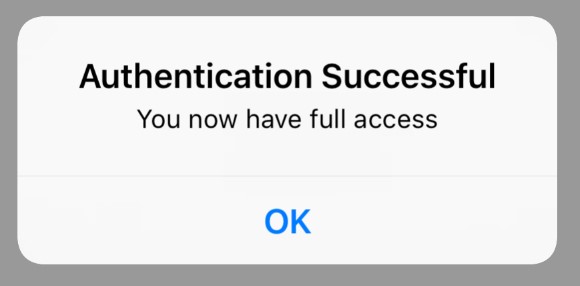
To simulate a matching face, select the Features -> Face ID -> Matching Face menu option, after which the app should display the dialog shown in Figure 57-7 indicating that the authentication was successful:
Repeat the authentication process, selecting the Non-matching menu option and verifying that the authentication fails.
|
You are reading a sample chapter from Building iOS 17 Apps using Xcode Storyboards.
Buy the full book now in eBook or Print format. The full book contains 96 chapters and 760 pages of in-depth information. |
Launch the app on a physical device with Touch ID support, or use a suitable simulator (for example, an iPhone 8) to test Touch ID authentication. If using a simulator, ensure that the Features -> Touch ID -> Enrolled option is enabled before clicking the Authenticate button. Then, when instructed to touch the home button, select the Features -> Touch ID -> Matching Touch menu option to test the authentication. After successful authentication, try again using the Non-matching Touch option.
Summary
Introduced with iOS 7 and the iPhone 5s device, Touch ID has been provided to iOS users to gain access to devices and make Apple-related purchases. Since the introduction of iOS 8, fingerprint authentication using the Touch ID system has been available to app developers. In addition, with the introduction of iOS 11 running on the iPhone X, authentication support has been extended to include facial recognition. This chapter has outlined the steps involved in using the Local Authentication Framework to implement biometric authentication using both the Touch ID and Face ID systems.