
One of the few types of Auto Layout constraints that cannot be implemented within the Interface Builder environment references views contained in different view hierarchies. Constraints of this type must, therefore, be implemented in code. Fortunately, however, the steps to achieve this are quite simple. The objective of this chapter is to work through an example that demonstrates the creation of a cross-view hierarchy Auto Layout constraint.
The Example App
For this example, a straightforward user interface will be created consisting of two Views, a Button, and a Label. In terms of the physical view hierarchy, the user interface will be constructed as outlined in Figure 21-1.
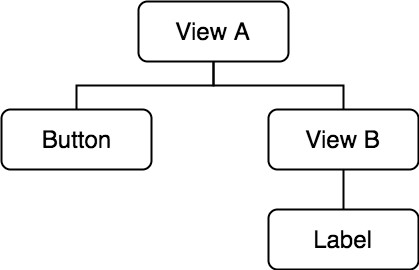
The goal will be to implement a constraint that aligns the centers of the Button and Label, which are part of different view hierarchies – the button being part of the hierarchy contained by View A and the label being part of the View B sub-hierarchy.
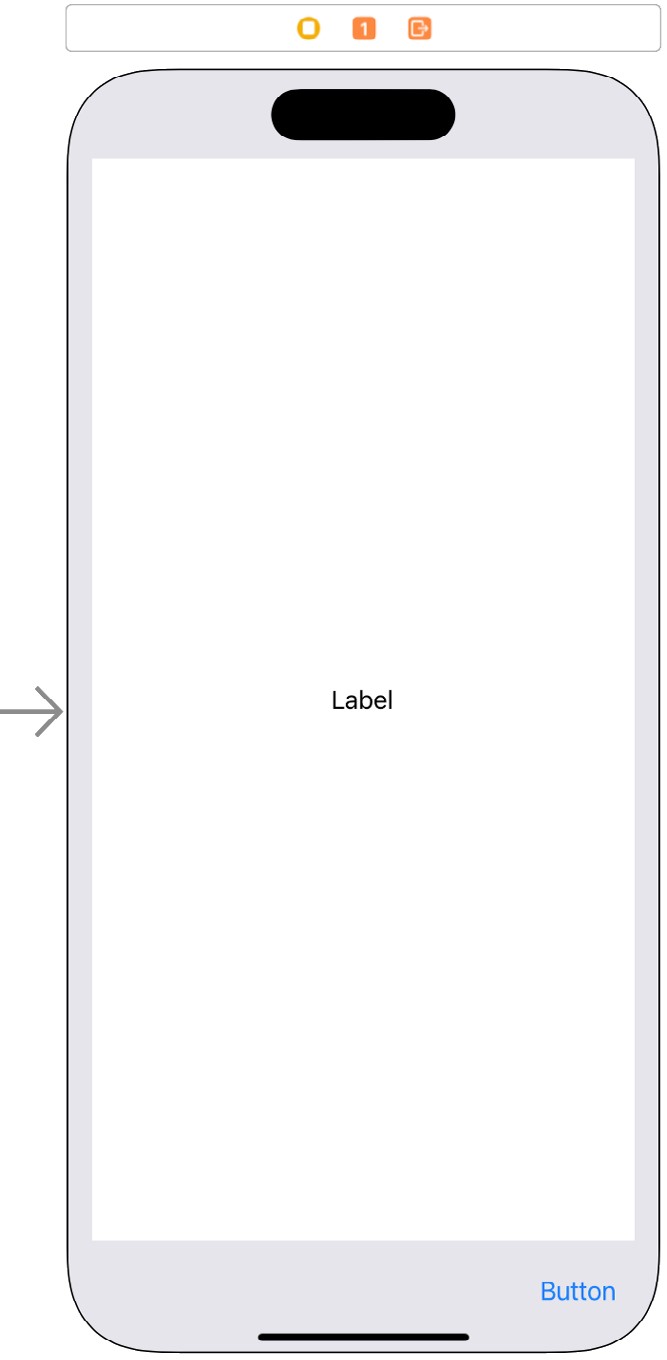
In terms of visual layout, the user interface should appear as illustrated in Figure 21-2. Key points to note are that the label should have constraints associated with it which horizontally and vertically center it within View B, and the button view should be positioned so that it is off-center in the horizontal axis:
Begin by launching Xcode and selecting the options to create a new iOS app based on the App template. Enter CrossView as the product name and set the Language to Swift and the Interface to Storyboard.
 |
You are reading a sample chapter from Building iOS 17 Apps using Xcode Storyboards.
Buy the full book now in eBook or Print format. The full book contains 96 chapters and 760 pages of in-depth information. |
Select the Main.storyboard file from the project navigator panel, select the view and change the background color to a light shade of grey using the Attributes Inspector. Next, display the Library dialog and drag a View, Button, and Label onto the design canvas as illustrated in Figure 21-2. Making sure to center the label object horizontally and vertically within the parent view.
Select the newly added View object, click on the Resolve Auto Layout Issues menu from the toolbar in the lower right-hand corner of the canvas, and select the Reset to Suggested Constraints option listed under All Views in View Controller.
Establishing Outlets
We will need to implement some outlets to set a cross-hierarchy constraint within the code. Since the constraint will need to reference both the button and the label, outlets need to be configured for these views. Select the label object and display the Assistant Editor using the Editor -> Assistant menu option
Make sure that the Assistant Editor is showing the ViewController.swift file. Ctrl-click on the Label object in the view and drag the resulting line to the area immediately beneath the class declaration directive in the Assistant Editor panel. Upon releasing the line, the connection panel will appear. Configure the connection as an Outlet named myLabel and click on the Connect button. Repeat the above steps to add an outlet for the button object named myButton.
As currently constrained, the label object is centered horizontally within the view we refer to as View B. In place of this constraint, we need the label to be aligned with the center of the button object. This will involve removing and replacing the CenterX constraint with a new constraint referencing the button. This requires outlets for both the View B instance and the CenterX constraint.
|
You are reading a sample chapter from Building iOS 17 Apps using Xcode Storyboards.
Buy the full book now in eBook or Print format. The full book contains 96 chapters and 760 pages of in-depth information. |
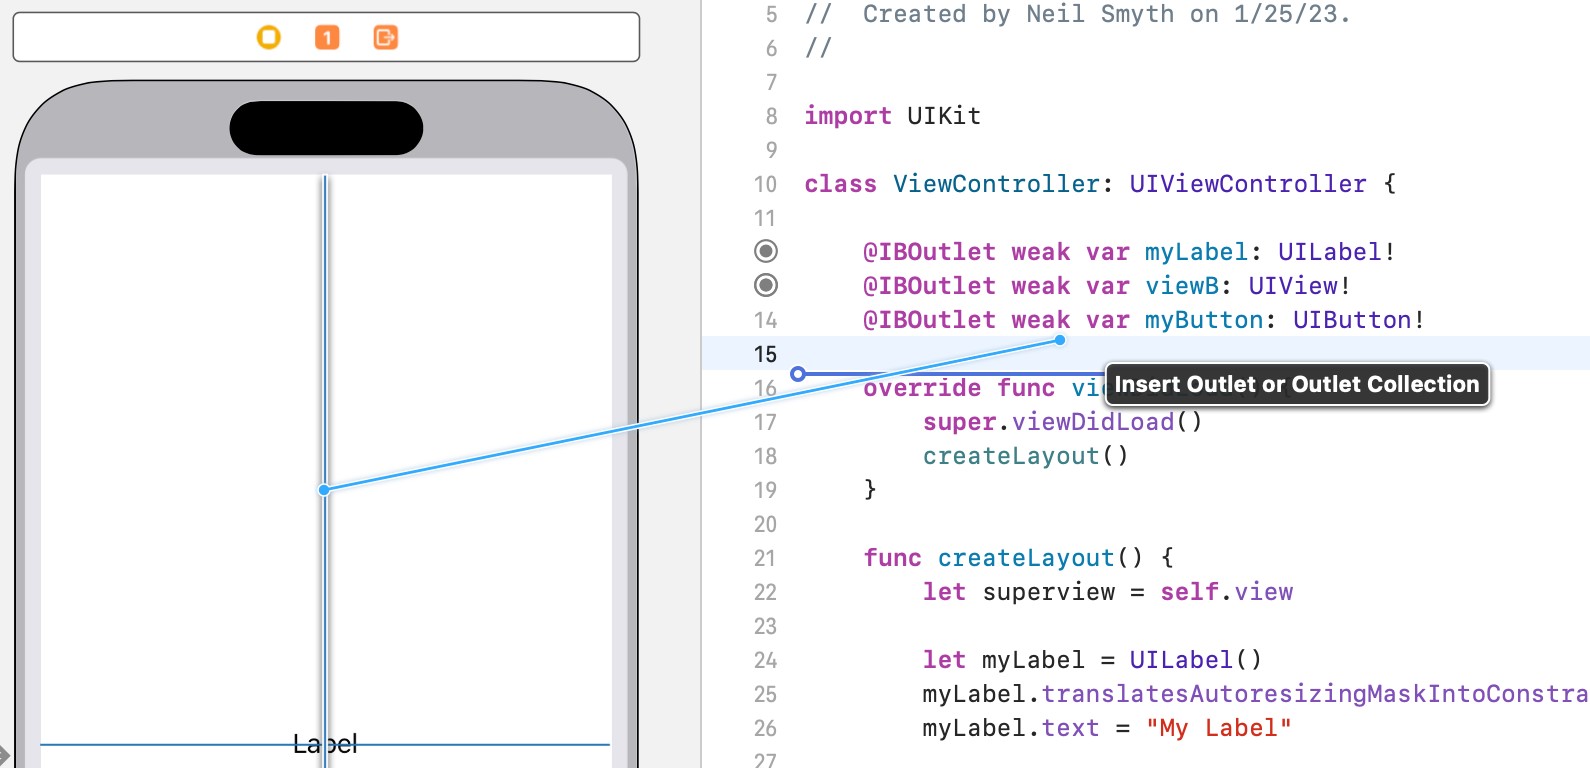
Ctrl-click on the View B parent of the label object and drag the resulting line to the area immediately beneath the previously declared outlets in the Assistant Editor. Release the line and configure an outlet named viewB.
Next, select the label object so that the associated constraint lines appear. Click on the vertical line passing through the label view so that it highlights. Next, ctrl-click on the constraint line, drag to the Assistant Editor panel (Figure 21-3), and create a new outlet for this object named centerConstraint.
Writing the Code to Remove the Old Constraint
With the necessary outlets created, the next step is to write some code to remove the center constraint from the label object. For this example, all code will be added to the viewDidLoad method of the view controller. Select the ViewController.swift file and locate and modify the method as follows:
override func viewDidLoad() {
    super.viewDidLoad()
    viewB.removeConstraint(centerConstraint)
}
All the code is doing is calling the removeConstraint method of view B using the previously configured outlet, passing through a reference to the CenterX constraint, and again using the previously configured outlet to that object.
Adding the Cross Hierarchy Constraint
All that remains is to add the constraint to align the centers of the label and button. With the appropriate outlets already configured, this is simply a matter of adding a layout anchor constraint between the label and button views:
|
You are reading a sample chapter from Building iOS 17 Apps using Xcode Storyboards.
Buy the full book now in eBook or Print format. The full book contains 96 chapters and 760 pages of in-depth information. |
override func viewDidLoad() {
    super.viewDidLoad()

    viewB.removeConstraint(centerConstraint)

    myLabel.trailingAnchor.constraint(equalTo: myButton.trailingAnchor).
                                                              isActive=true
}
Testing the App
Compile and run the app on a physical iOS device or the iOS Simulator. When the app runs, the label view should be aligned with the button, which should be maintained when the device is rotated into landscape orientation.
Summary
The current version of Interface Builder does not provide a way to select two views that reside in different view hierarchies and configure a constraint between them. However, as outlined in this chapter, the desired result can be achieved in code. Of crucial importance in this process is the fact that constraints, just like any other view object in a user interface, may be connected to an outlet and accessed via code.