
As previously discussed in Drawing iOS 2D Graphics with Core Graphics, the Quartz 2D API is the primary mechanism by which 2D drawing operations are performed within iOS apps. Having provided an overview of Quartz 2D as it pertains to iOS development in that chapter, the focus of this chapter is to provide a tutorial that provides examples of how 2D drawing is performed. If you are new to Quartz 2D and have not yet read Drawing iOS 2D Graphics with Core Graphics, it is recommended to do so before embarking on this tutorial.
The iOS Drawing Example App
If you are reading this book sequentially and have created the LiveViewDemo project as outlined in the chapter entitled Interface Builder Live Views and iOS 16 Embedded Frameworks, then the code in this chapter may be placed in the draw method contained within the MyDrawView.swift file and the results viewed dynamically within the live view in the Main.storyboard file. On the other hand, if you have not yet completed the Interface Builder Live Views and iOS 16 Embedded Frameworks, follow the steps in the next three sections to create a new project, add a UIView subclass, and locate the draw method.
Creating the New Project
The app created in this tutorial will contain a subclassed UIView component within which the draw method will be overridden and used to perform various 2D drawing operations. Launch Xcode and create a new project using the iOS App template with the Swift and Storyboard options selected, entering Draw2D as the product name.
Creating the UIView Subclass
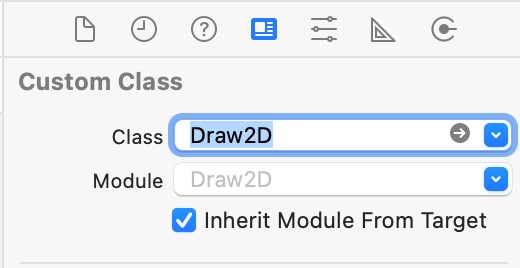
To draw graphics on the view, it is necessary to create a subclass of the UIView object and override the draw method. In the project navigator panel on the left-hand side of the main Xcode window, right-click on the Draw2D folder entry and select New File… from the resulting menu. In the New File window, select the iOS source Cocoa Touch Class icon and click Next. On the subsequent options screen, change the Subclass of menu to UIView and the class name to Draw2D. Click Next, and on the final screen, click on the Create button.
Select the Main.storyboard file followed by the UIView component in either the view controller canvas or the document outline panel. Display the Identity Inspector and change the Class setting from UIView to our new class named Draw2D:
 |
You are reading a sample chapter from Building iOS 17 Apps using Xcode Storyboards.
Buy the full book now in eBook or Print format. The full book contains 96 chapters and 760 pages of in-depth information. |
Locating the draw Method in the UIView Subclass
Now that we have subclassed our app’s UIView, the next step is implementing the draw method in this subclass. Fortunately, Xcode has already created a template for this method for us. Select the Draw2D.swift file in the project navigator panel to locate this method. Having located the method in the file, remove the comment markers (/* and */) within which it is currently encapsulated:
import UIKit

class Draw2D: UIView {

    override func draw(_ rect: CGRect) {
        // Drawing code
    }
}Code language: Swift (swift)
In the remainder of this tutorial, we will modify the code in the draw method to perform various drawing operations.
Drawing a Line
To draw a line on a device screen using Quartz 2D, we first need to obtain the graphics context for the view:
let context = UIGraphicsGetCurrentContext()Code language: Swift (swift)Once the context has been obtained, the width of the line we plan to draw needs to be specified:
context?.setLineWidth(3.0)Code language: Swift (swift)Next, we need to create a color reference. We can do this by specifying the RGBA components of the required color (in this case, opaque blue):
|
You are reading a sample chapter from Building iOS 17 Apps using Xcode Storyboards.
Buy the full book now in eBook or Print format. The full book contains 96 chapters and 760 pages of in-depth information. |
let colorSpace = CGColorSpaceCreateDeviceRGB()
let components: [CGFloat] = [0.0, 0.0, 1.0, 1.0]
let color = CGColor(colorSpace: colorSpace, components: components)Code language: Swift (swift)
Using the color reference and the context, we can now specify that the color is to be used when drawing the line:
context?.setStrokeColor(color!)Code language: Swift (swift)The next step is to move to the start point of the line that is going to be drawn:
context?.move(to: CGPoint(x: 50, y: 50))Code language: Swift (swift)The above line of code indicates that the start point for the line is the top left-hand corner of the device display. We now need to specify the endpoint of the line, in this case, 300, 400:
context?.addLine(to: CGPoint(x: 300, y: 400))Code language: Swift (swift)Having defined the line width, color, and path, we are ready to draw the line:
context?.strokePath()Code language: Swift (swift)Bringing this all together gives us a draw method that reads as follows:
|
You are reading a sample chapter from Building iOS 17 Apps using Xcode Storyboards.
Buy the full book now in eBook or Print format. The full book contains 96 chapters and 760 pages of in-depth information. |
override func draw(_ rect: CGRect)
{
    let context = UIGraphicsGetCurrentContext()
    context?.setLineWidth(3.0)
    let colorSpace = CGColorSpaceCreateDeviceRGB()
    let components: [CGFloat] = [0.0, 0.0, 1.0, 1.0]
    let color = CGColor(colorSpace: colorSpace, components: components)
    context?.setStrokeColor(color!)
    context?.move(to: CGPoint(x: 50, y: 50))
    context?.addLine(to: CGPoint(x: 300, y: 400))
    context?.strokePath()
}Code language: Swift (swift)
When compiled and run, the app should display as illustrated in Figure 60-2:

Note that we manually created the colorspace and color reference in the above example. As described in Drawing iOS 2D Graphics with Core Graphics, colors can also be created using the UIColor class. For example, the same result as outlined above can be achieved with fewer lines of code as follows:
override func draw(_ rect: CGRect) {
    let context = UIGraphicsGetCurrentContext()
    context?.setLineWidth(3.0)
    context?.setStrokeColor(UIColor.blue.cgColor)
    context?.move(to: CGPoint(x: 50, y: 50))
    context?.addLine(to: CGPoint(x: 300, y: 400))
    context?.strokePath()
}Code language: Swift (swift)
Drawing Paths
As you may have noticed, we draw a single line in the above example by defining the path between two points. Defining a path comprising multiple points allows us to draw using a sequence of straight lines connected using repeated calls to the addLine(to:) context method. Non-straight lines may also be added to a shape using calls to, for example, the addArc method.
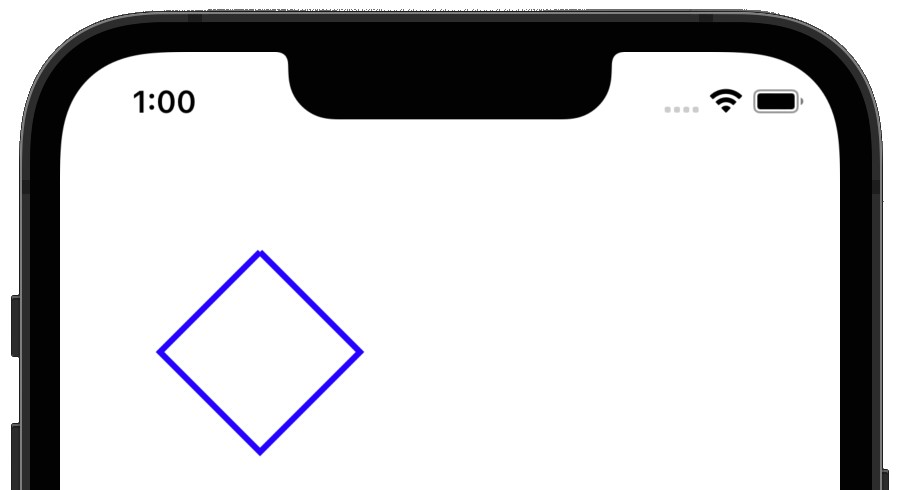
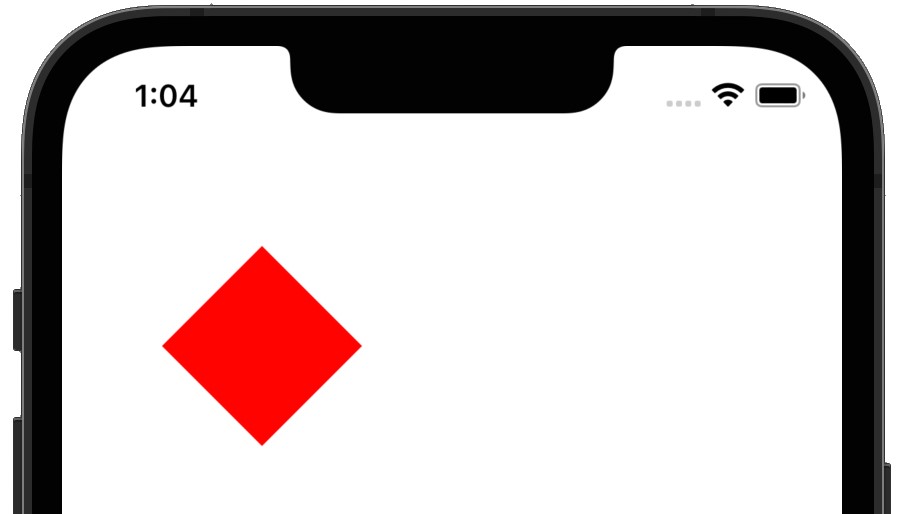
The following code, for example, draws a diamond shape:
override func draw(_ rect: CGRect)
{
    let context = UIGraphicsGetCurrentContext()
    context?.setLineWidth(3.0)
    context?.setStrokeColor(UIColor.blue.cgColor)
    context?.move(to: CGPoint(x:100, y: 100))
    context?.addLine(to: CGPoint(x: 150, y: 150))
    context?.addLine(to: CGPoint(x: 100, y: 200))
    context?.addLine(to: CGPoint(x: 50, y: 150))
    context?.addLine(to: CGPoint(x: 100, y: 100))
    context?.strokePath()
}Code language: Swift (swift)
When executed, the above code should produce output that appears as shown in Figure 60-3:
|
You are reading a sample chapter from Building iOS 17 Apps using Xcode Storyboards.
Buy the full book now in eBook or Print format. The full book contains 96 chapters and 760 pages of in-depth information. |
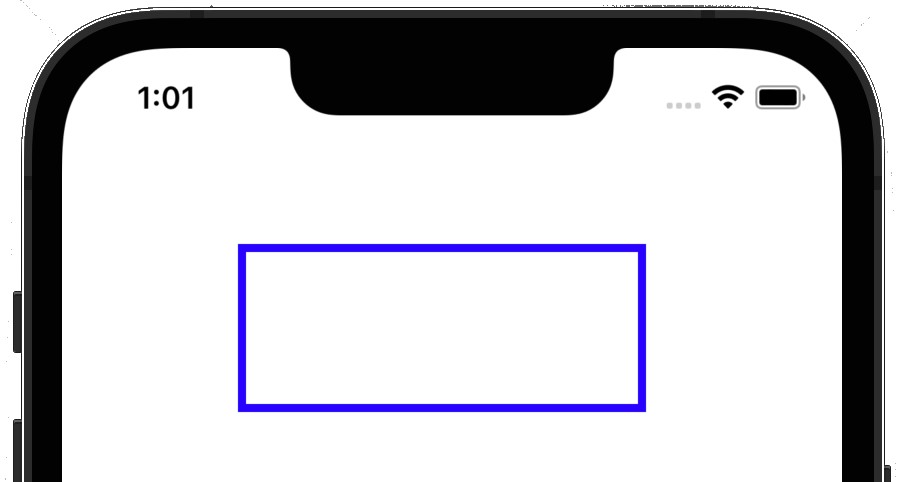
Drawing a Rectangle
Rectangles are drawn in much the same way as any other path is drawn, with the exception that the path is defined by specifying the x and y coordinates of the top left-hand corner of the rectangle together with the rectangle’s height and width. These dimensions are stored in a CGRect structure and passed through as an argument to the addRect method:
override func draw(_ rect: CGRect)
{
    let context = UIGraphicsGetCurrentContext()
    context?.setLineWidth(4.0)
    context?.setStrokeColor(UIColor.blue.cgColor)
    let rectangle = CGRect(x: 90,y: 100,width: 200,height: 80)
    context?.addRect(rectangle)
    context?.strokePath()
}Code language: Swift (swift)
The above code will result in the following display when compiled and executed:
Drawing an Ellipse or Circle
Circles and ellipses are drawn by defining the rectangular area into which the shape must fit and then calling the addEllipse(in:) context method:
override func draw(_ rect: CGRect)
{
    let context = UIGraphicsGetCurrentContext()
    context?.setLineWidth(4.0)
    context?.setStrokeColor(UIColor.blue.cgColor)
    let rectangle = CGRect(x: 85,y: 100,width: 200,height: 80)
    context?.addEllipse(in: rectangle)
    context?.strokePath()
}Code language: Swift (swift)
When compiled, the above code will produce the following graphics:
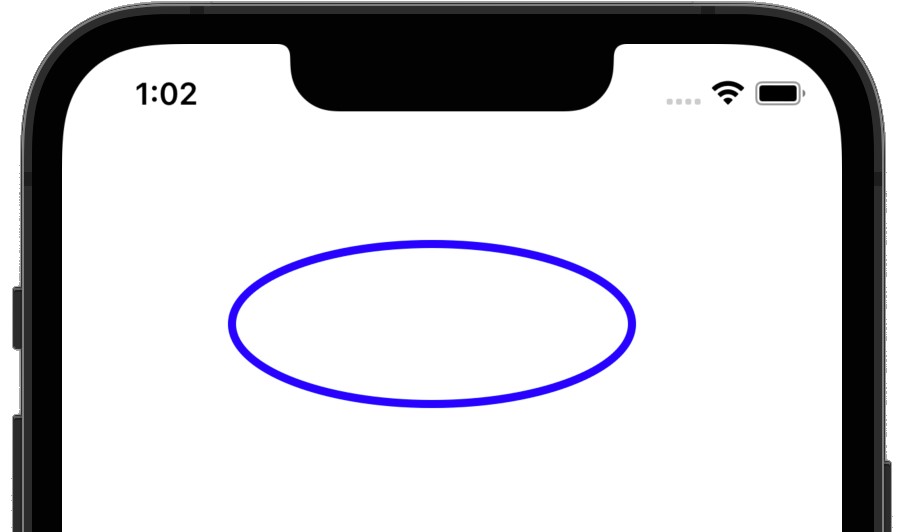
To draw a circle, simply define a rectangle with equal-length sides (a square, in other words).
|
You are reading a sample chapter from Building iOS 17 Apps using Xcode Storyboards.
Buy the full book now in eBook or Print format. The full book contains 96 chapters and 760 pages of in-depth information. |
Filling a Path with a Color
A path may be filled with color using a variety of Quartz 2D API functions. For example, rectangular and elliptical paths may be filled using the fill(rect:) and fillEllipse(in:) context methods, respectively. Similarly, a path may be filled using the fillPath method. Before executing a fill operation, the fill color must be specified using the setFillColor method.
The following example defines a path and then fills it with the color red:
override func draw(_ rect: CGRect)
{
    let context = UIGraphicsGetCurrentContext()
    context?.move(to: CGPoint(x: 100, y: 100))
    context?.addLine(to: CGPoint(x: 150, y: 150))
    context?.addLine(to: CGPoint(x: 100, y: 200))
    context?.addLine(to: CGPoint(x: 50, y: 150))
    context?.addLine(to: CGPoint(x: 100, y: 100))
    context?.setFillColor(UIColor.red.cgColor)
    context?.fillPath()
}Code language: Swift (swift)
The above code produces the following graphics on the device or simulator display when executed:
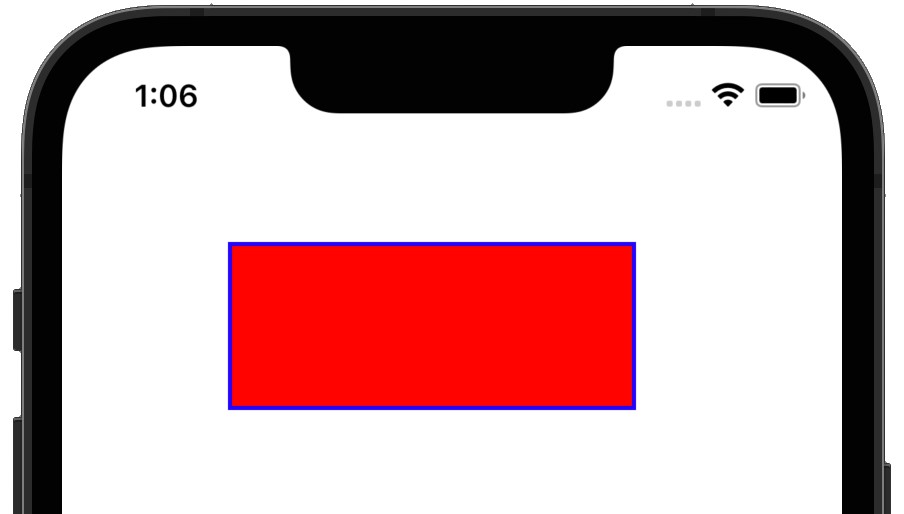
The following code draws a rectangle with a blue border and then once again fills the rectangular space with red:
override func draw(_ rect: CGRect)
{
    let context = UIGraphicsGetCurrentContext()
    context?.setLineWidth(4.0)
    context?.setStrokeColor(UIColor.blue.cgColor)
    let rectangle = CGRect(x: 85,y: 100,width: 200,height: 80)
    context?.addRect(rectangle)
    context?.strokePath()
    context?.setFillColor(UIColor.red.cgColor)
    context?.fill(rectangle)
}Code language: Swift (swift)
When added to the example app, the resulting display should appear as follows:
|
You are reading a sample chapter from Building iOS 17 Apps using Xcode Storyboards.
Buy the full book now in eBook or Print format. The full book contains 96 chapters and 760 pages of in-depth information. |
Drawing an Arc
An arc may be drawn by specifying two tangent points and a radius using the addArc context method, for example:
override func draw(_ rect: CGRect)
{
    let context = UIGraphicsGetCurrentContext()
    context?.setLineWidth(4.0)
    context?.setStrokeColor(UIColor.blue.cgColor)
    context?.move(to: CGPoint(x: 100, y: 100))
    context?.addArc(tangent1End: CGPoint(x: 100, y: 200),
		tangent2End: CGPoint(x: 300, y: 200), radius: 100)
    context?.strokePath()
}Code language: Swift (swift)
The above code will result in the following graphics output:
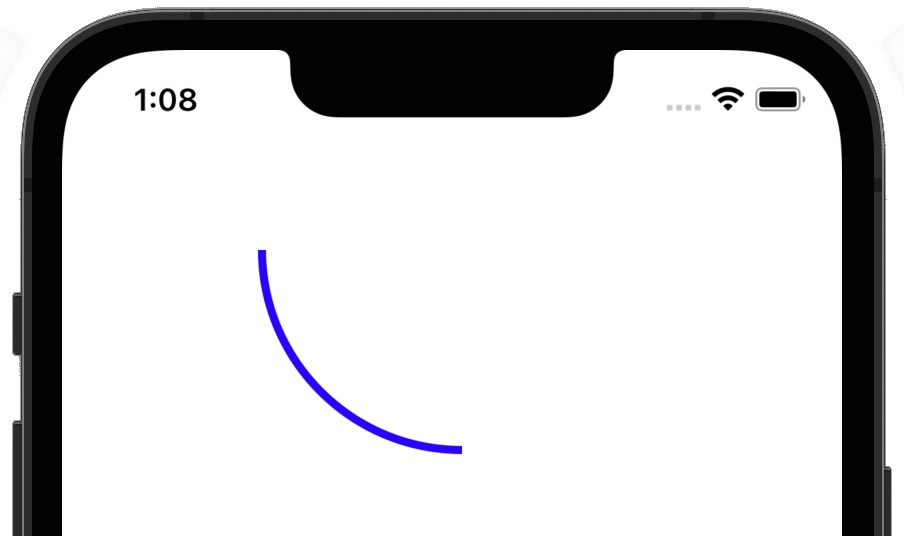
Drawing a Cubic Bézier Curve
A cubic Bézier curve may be drawn by moving to a start point and then passing two control points and an end point through to the addCurve(to:) method:
override func draw(_ rect: CGRect)
{
        let context = UIGraphicsGetCurrentContext()
        context?.setLineWidth(4.0)
        context?.setStrokeColor(UIColor.blue.cgColor)
        context?.move(to: CGPoint(x: 30, y: 30))
        context?.addCurve(to: CGPoint(x: 20, y: 50),
                          control1: CGPoint(x: 300, y: 250),
                          control2: CGPoint(x: 300, y: 70))
        context?.strokePath()
}Code language: Swift (swift)
The above code will cause the curve illustrated in Figure 60-9 to be drawn when compiled and executed in our example app:
Drawing a Quadratic Bézier Curve
A quadratic Bézier curve is drawn using the addQuadCurve(to:) method, providing a control and end point as arguments having first moved to the start point:
|
You are reading a sample chapter from Building iOS 17 Apps using Xcode Storyboards.
Buy the full book now in eBook or Print format. The full book contains 96 chapters and 760 pages of in-depth information. |
override func draw(_ rect: CGRect)
{
let context = UIGraphicsGetCurrentContext()
context?.setLineWidth(4.0)
context?.setStrokeColor(UIColor.blue.cgColor)
context?.move(to: CGPoint(x: 10, y: 200))
context?.addQuadCurve(to: CGPoint(x: 300, y: 200),
control: CGPoint(x: 150, y: 10))
context?.strokePath()
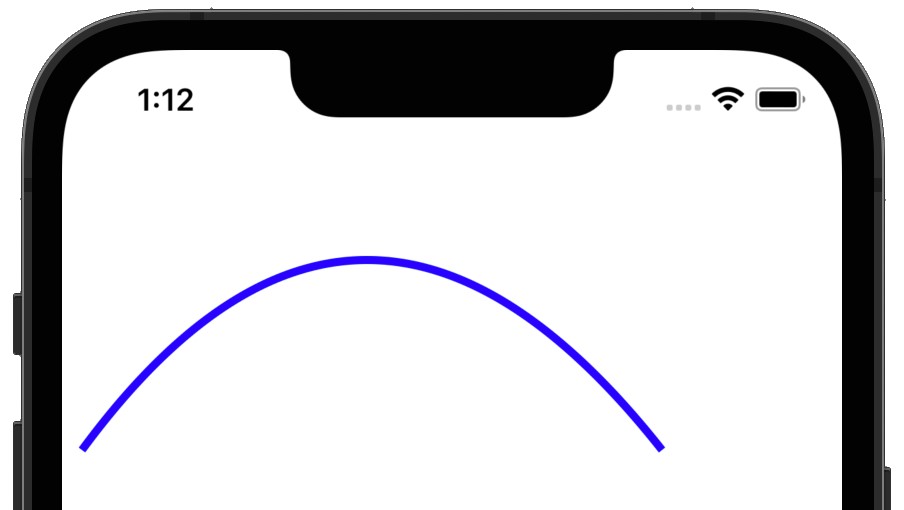
}Code language: Swift (swift)The above code, when executed, will display a curve that appears as illustrated in the following figure:
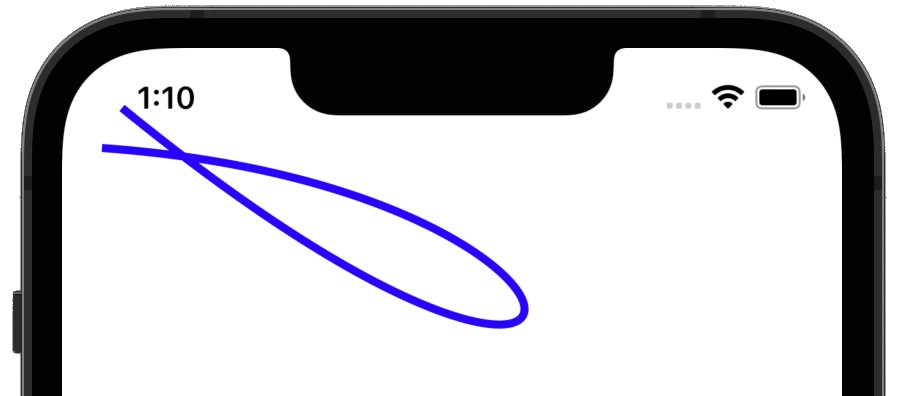
Dashed Line Drawing
So far in this chapter, we have performed all our drawing with a solid line. Quartz also provides support for drawing dashed lines. This is achieved via the Quartz setLineDash method, which takes as its arguments the following:
- context – The graphics context of the view on which the drawing is to take place
- phase – A floating point value that specifies how far into the dash pattern the line starts
- lengths – An array containing values for the lengths of the painted and unpainted sections of the line. For example, an array containing 5 and 6 would cycle through 5 painted unit spaces followed by 6 unpainted unit spaces.
- count – A count of the number of items in the lengths array
For example, a [2,6,4,2] lengths array applied to a curve drawing of line thickness 5.0 will appear as follows:
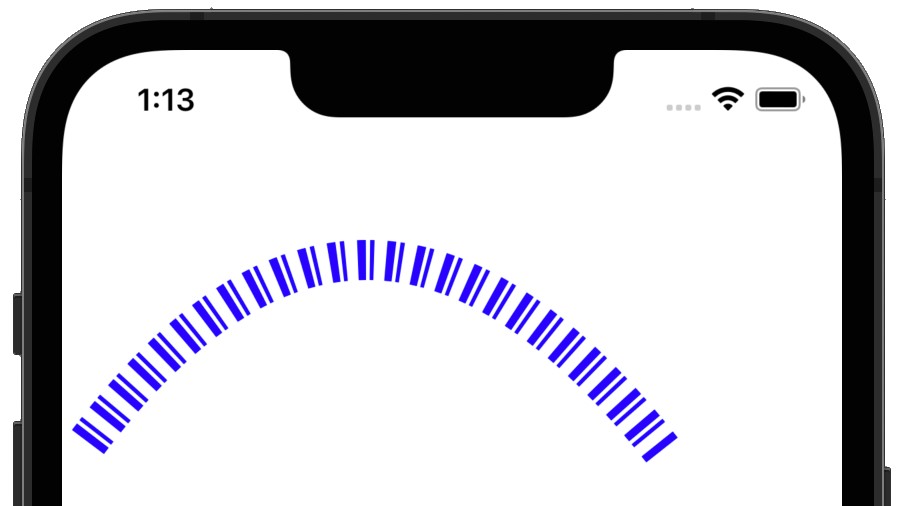
The corresponding draw method code that drew the above line reads as follows:
override func draw(_ rect: CGRect)
{
    let context = UIGraphicsGetCurrentContext()
    context?.setLineWidth(20.0)
    context?.setStrokeColor(UIColor.blue.cgColor)
    let dashArray:[CGFloat] = [2,6,4,2]
    context?.setLineDash(phase: 3, lengths: dashArray)
    context?.move(to: CGPoint(x: 10, y: 200))
    context?.addQuadCurve(to: CGPoint(x: 300, y: 200),
		control: CGPoint(x: 150, y: 10))
    context?.strokePath()
}Code language: Swift (swift)
Drawing Shadows
In addition to drawing shapes, Core Graphics can also be used to create shadow effects. This is achieved using the setShadow method, passing through a graphics context, offset values for the position of the shadow relative to the shape for which the shadow is being drawn, and a value specifying the degree of blurring required for the shadow effect.
|
You are reading a sample chapter from Building iOS 17 Apps using Xcode Storyboards.
Buy the full book now in eBook or Print format. The full book contains 96 chapters and 760 pages of in-depth information. |
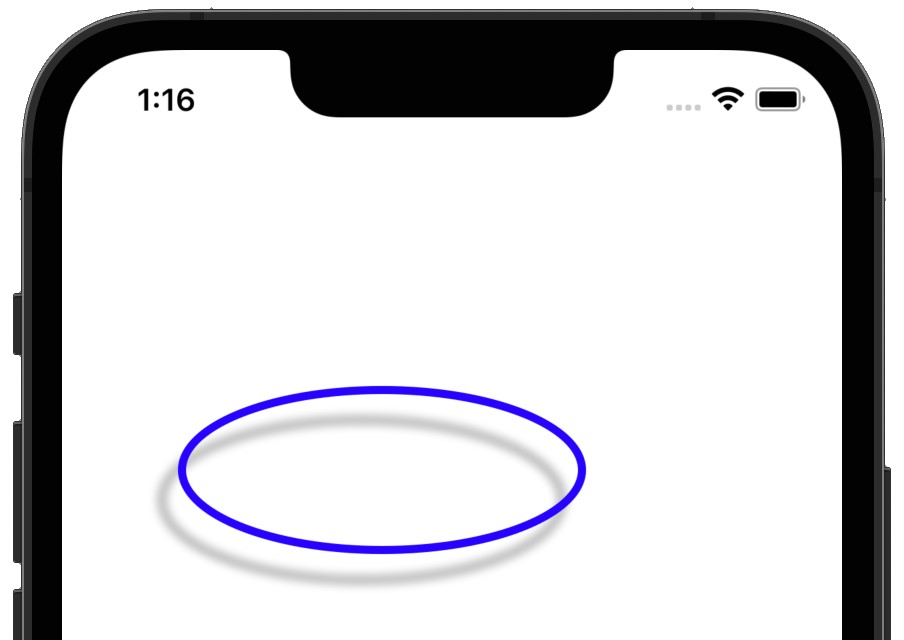
The following code, for example, draws an ellipse with a shadow:
override func draw(_ rect: CGRect)
{
    let context = UIGraphicsGetCurrentContext()
    let myShadowOffset = CGSize (width: -10,  height: 15)

    context?.saveGState()
    context?.setShadow(offset: myShadowOffset, blur: 5)
    context?.setLineWidth(4.0)
    context?.setStrokeColor(UIColor.blue.cgColor)
    let rectangle = CGRect(x: 60,y: 170,width: 200,height: 80)
    context?.addEllipse(in: rectangle)
    context?.strokePath()
    context?.restoreGState()
}Code language: Swift (swift)
When executed, the above code will produce the effect illustrated in Figure 60-12:
Drawing Gradients
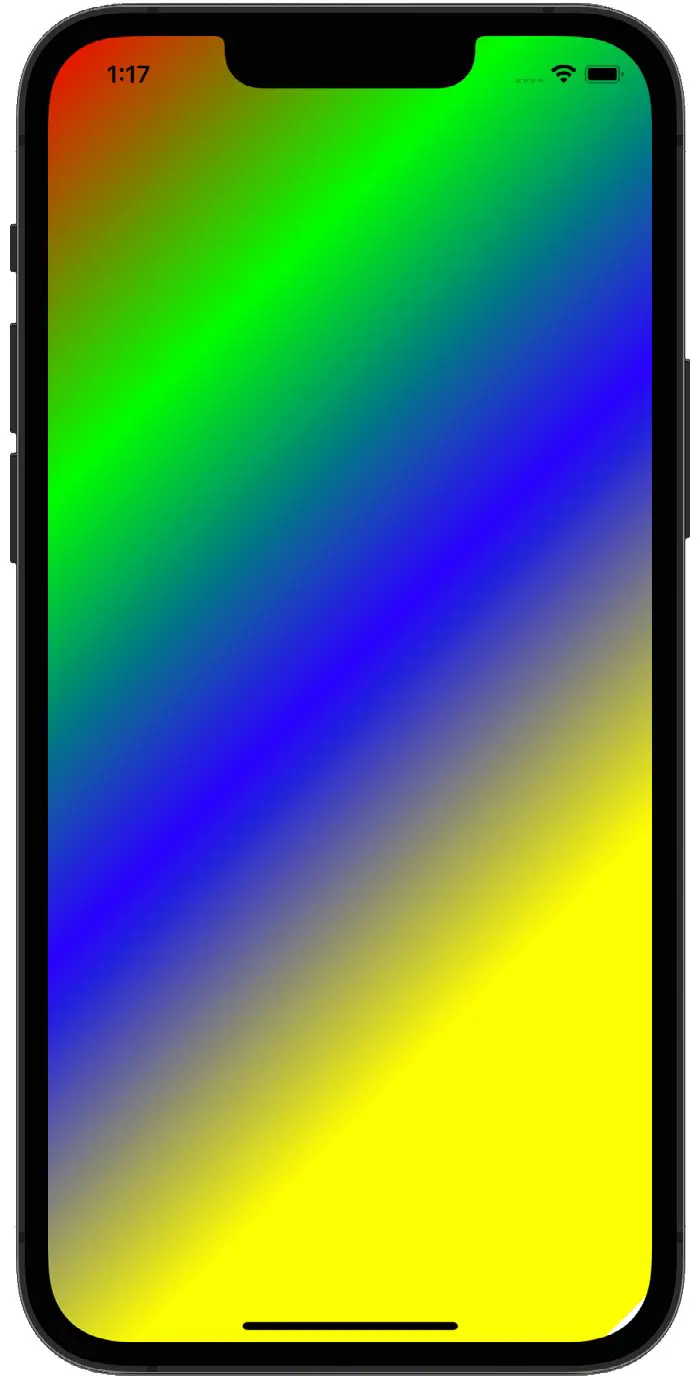
Gradients are implemented using the Core Graphics CGGradient class, which supports linear, radial, and axial gradients. The CGGradient class essentially involves the specification of two or more colors together with a set of location values. The location values indicate the points at which the gradient should switch from one color to another as the gradient is drawn along an axis line where 0.0 represents the start of the axis, and 1.0 is the endpoint. Assume, for example, that you wish to create a gradient that transitions through three different colors along the gradient axis, with each color being given an equal amount of space within the gradient. In this situation, three locations would be specified. The first would be 0.0 to represent the start of the gradient. Two more locations would then need to be specified for the transition points to the remaining colors. Finally, to equally divide the axis among the colors, these would need to be set to 0.3333 and 0.6666, respectively.
Having configured a CGGradient instance, a linear gradient is drawn via a call to the drawLinearGradient method of the context object, passing through the colors, locations, and start and end points as arguments.
The following code, for example, draws a linear gradient using four colors with four equally spaced locations:
|
You are reading a sample chapter from Building iOS 17 Apps using Xcode Storyboards.
Buy the full book now in eBook or Print format. The full book contains 96 chapters and 760 pages of in-depth information. |
override func draw(_ rect: CGRect)
{
    let context = UIGraphicsGetCurrentContext()

    let locations: [CGFloat] = [ 0.0, 0.25, 0.5, 0.75 ]

    let colors = [UIColor.red.cgColor,
                  UIColor.green.cgColor,
                  UIColor.blue.cgColor,
                  UIColor.yellow.cgColor]

    let colorspace = CGColorSpaceCreateDeviceRGB()

    let gradient = CGGradient(colorsSpace: colorspace,
                  colors: colors as CFArray, locations: locations)

    var startPoint = CGPoint()
    var endPoint =  CGPoint()

    startPoint.x = 0.0
    startPoint.y = 0.0
    endPoint.x = 600
    endPoint.y = 600

    if let gradient = gradient {
        context?.drawLinearGradient(gradient,
                                start: startPoint, end: endPoint,
                                options: .drawsBeforeStartLocation)
    }
}Code language: Swift (swift)
When executed, the above code will generate the gradient shown in Figure 60-13:
Radial gradients involve drawing a gradient between two circles. When the circles are positioned apart from each other and given different sizes, a conical effect is achieved, as shown in Figure 60-14:
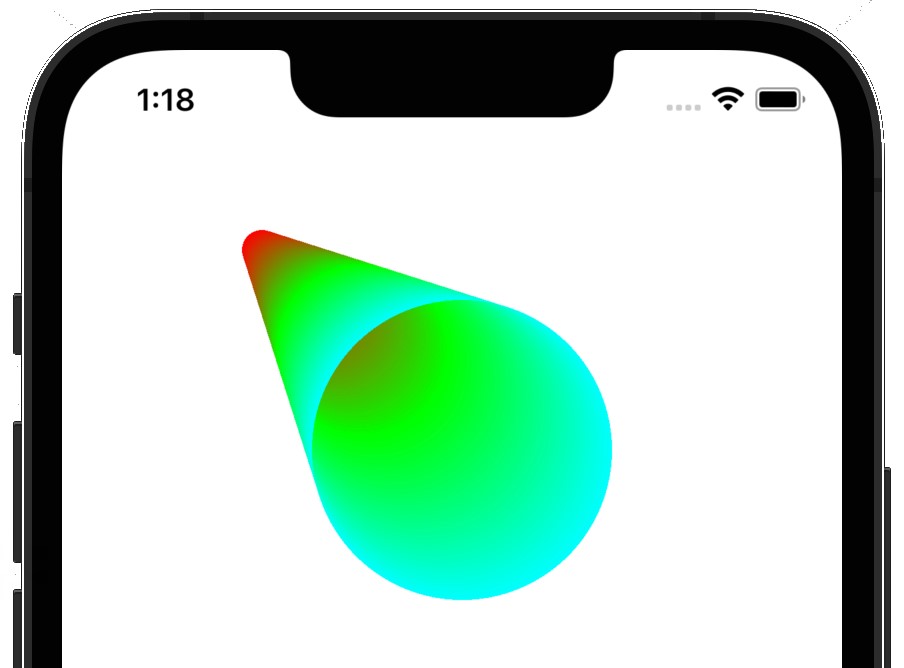
The code to draw the above radial gradient sets up the colors and locations for the gradient before declaring the center points and radius values for two circles. The gradient is then drawn via a call to the drawRadialGradient method:
override func draw(_ rect: CGRect)
{
let context = UIGraphicsGetCurrentContext()
let locations: [CGFloat] = [0.0, 0.5, 1.0]
let colors = [UIColor.red.cgColor,
UIColor.green.cgColor,
UIColor.cyan.cgColor]
let colorspace = CGColorSpaceCreateDeviceRGB()
let gradient = CGGradient(colorsSpace: colorspace,
colors: colors as CFArray, locations: locations)
var startPoint = CGPoint()
var endPoint = CGPoint()
startPoint.x = 100
startPoint.y = 100
endPoint.x = 200
endPoint.y = 200
let startRadius: CGFloat = 10
let endRadius: CGFloat = 75
if let gradient = gradient {
context?.drawRadialGradient(gradient, startCenter: startPoint,
startRadius: startRadius,
endCenter: endPoint,
endRadius: endRadius, options: [])
}
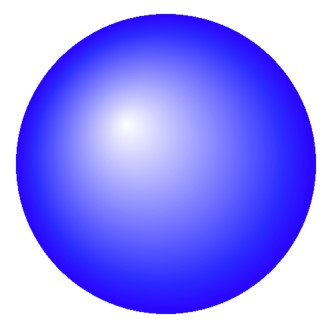
}Code language: Swift (swift)Interesting effects may also be created by assigning a radius of 0 to the starting point circle and positioning it within the circumference of the endpoint circle:
override func draw(_ rect: CGRect)
{
    let context = UIGraphicsGetCurrentContext()
    let locations: [CGFloat] = [0.0, 1.0]

    let colors = [UIColor.white.cgColor,
                      UIColor.blue.cgColor]

    let colorspace = CGColorSpaceCreateDeviceRGB()

    let gradient = CGGradient(colorsSpace: colorspace,
                    colors: colors as CFArray, locations: locations)

    var startPoint = CGPoint()
    var endPoint = CGPoint()
    startPoint.x = 180
    startPoint.y = 180
    endPoint.x = 200
    endPoint.y = 200
    let startRadius: CGFloat = 0
    let endRadius: CGFloat = 75

    if let gradient = gradient {
        context?.drawRadialGradient (gradient, startCenter: startPoint,
                                 startRadius: startRadius,
                                 endCenter: endPoint,
                                 endRadius: endRadius,
                                 options: .drawsBeforeStartLocation)
    }
}Code language: Swift (swift)
When executed, the above code creates the appearance of light reflecting on the surface of a shiny blue sphere:
|
You are reading a sample chapter from Building iOS 17 Apps using Xcode Storyboards.
Buy the full book now in eBook or Print format. The full book contains 96 chapters and 760 pages of in-depth information. |
Drawing an Image into a Graphics Context
An image may be drawn into a graphics context either by specifying the coordinates of the top left-hand corner of the image (in which case the image will appear full size) or resized so that it fits into a specified rectangular area. Before we can display an image in our example app, that image must first be added to the project resources.
Begin by locating the desired image using the Finder and then drag and drop that image onto the project navigator panel of the Xcode main project window.
The following example draw method code displays the image in a file named cat.png full size located at 0, 0:
override func draw(_ rect: CGRect)
{
    let myImage = UIImage(named: "myImage.png")
    let imagePoint = CGPoint(x: 0, y: 0)
    myImage?.draw(at: imagePoint)
}Code language: Swift (swift)
As is evident when the app is run, the size of the image far exceeds the available screen size:
Using the draw method of the UIImage object, however, we can scale the image to fit better on the screen. In this instance, it is useful to identify the screen size since this changes depending on the device on which the app is running. This can be achieved using the mainScreen and bounds methods of the UIScreen class. The mainScreen method returns another UIScreen object representing the device display. Calling the bounds method of that object returns the dimensions of the display in the form of a CGRect object:
|
You are reading a sample chapter from Building iOS 17 Apps using Xcode Storyboards.
Buy the full book now in eBook or Print format. The full book contains 96 chapters and 760 pages of in-depth information. |
override func draw(_ rect: CGRect)
{
    let myImage = UIImage(named: "myImage.png")
    let imageRect = UIScreen.main.bounds
    myImage?.draw(in: imageRect)
}Code language: Swift (swift)
This time, the entire image fits comfortably on the screen:
Image Filtering with the Core Image Framework
Having covered the concept of displaying images within an iOS app, now is a good time to provide a basic overview of the Core Image Framework.
Core Image was introduced with iOS 5 and provides a mechanism for filtering and manipulating still images and videos. Included with Core Image is a wide range of filters, together with the ability to build custom filters to meet specific requirements. Examples of filters that may be applied include cropping, color effects, blurring, warping, transformations, and gradients. A full list of filters is available in Apple’s Core Image Filter Reference document, located in the Apple Developer portal.
A CIImage object is typically initialized with a reference to the image to be manipulated. A CIFilter object is then created and configured with the type of filtering to be performed, together with any input parameters required by that filter. The CIFilter object is then instructed to perform the operation, and the modified image is subsequently returned as a CIImage object. The app’s CIContext reference may then be used to render the image for display to the user.
By way of an example of Core Image in action, we will modify the draw method of our Draw2D example app to render the previously displayed image in a sepia tone using the CISepiaTone filter. The first step, however, is to add the CoreImage Framework to the project. This is achieved by selecting the Draw2D target at the top of the project navigator and then selecting the Build Phases tab in the main panel. Next, unfold the Link Binary with Libraries section of the panel, click the + button, and locate and add the CoreImage.framework library from the resulting list.
|
You are reading a sample chapter from Building iOS 17 Apps using Xcode Storyboards.
Buy the full book now in eBook or Print format. The full book contains 96 chapters and 760 pages of in-depth information. |
Having added the framework, select the Draw2D.swift file and modify the draw method as follows:
override func draw(_ rect: CGRect) {

    if let myimage = UIImage(named: "myImage.png"),
       let sepiaFilter = CIFilter(name: "CISepiaTone") {

        let cimage = CIImage(image: myimage)

        sepiaFilter.setDefaults()
        sepiaFilter.setValue(cimage, forKey: "inputImage")
        sepiaFilter.setValue(NSNumber(value: 0.8 as Float),
                              forKey: "inputIntensity")

        let image = sepiaFilter.outputImage

        let context = CIContext(options: nil)

        let cgImage = context.createCGImage(image!,
                                            from: image!.extent)

        let resultImage = UIImage(cgImage: cgImage!)
        let imageRect = UIScreen.main.bounds
        resultImage.draw(in: imageRect)
    }
}Code language: Swift (swift)
The method begins by loading the image file used in the previous section of this chapter. Since Core Image works on CIImage objects, it is necessary to convert the UIImage to a CIImage. Next, a new CIFilter object is created and initialized with the CISepiaTone filter. The filter is then set to the default settings before being configured with the input image (in this case, our cimage object) and the filter’s intensity value (0.8).
With the filter object configured, its outputImage method is called to perform the manipulation, and the resulting modified image is assigned to a new CImage object. The CIContext reference for the app is then obtained and used to convert the CImage object to a CGImageRef object. This, in turn, is converted to a UIImage object which is then displayed to the user using the object’s draw method. When compiled and run, the image will appear in a sepia tone.
Summary
By subclassing the UIView class and overriding the draw method, various 2D graphics drawing operations may be performed on the view canvas. In this chapter, we have explored some of the graphics drawing capabilities of Quartz 2D to draw various line types and paths and present images on the iOS device screen.
Introduced in iOS 5, the Core Image Framework is designed to filter and manipulate images and video. In this chapter, we have provided a brief overview of Core Image and worked through a simple example that applied a sepia tone filter to an image.
|
You are reading a sample chapter from Building iOS 17 Apps using Xcode Storyboards.
Buy the full book now in eBook or Print format. The full book contains 96 chapters and 760 pages of in-depth information. |