
The previous chapter introduced message app extensions and described how the Messages framework allows custom, interactive messages to be sent and received from within the standard iOS Messages app.
In this chapter, many of the concepts described in the previous chapter will be put to practical use while working through the creation of an example interactive message app extension. Before following the tutorial, however, it is important to note that testing Message App extensions in a simulator environment has been unreliable for several years. Therefore, if you decide to complete this tutorial, you may only be able to test it if you have two iOS devices with separate Apple IDs or have a friend who will let you install the sample app on their device and play tic-tac-toe with you.
About the Example Message App Project
This tutorial will create an interactive message app extension project that implements a tic-tac-toe game designed to be played by two players via the Messages app. The first player begins the game by loading the app from the message app drawer and selecting from within the tic-tac-toe game grid. The current game status is then sent to a second player, appearing in the standard Messages app transcript area. Next, the second player selects the message to open the message app extension, where the next move can be made and sent back to the first player. This process repeats until the game is completed.
Creating the MessageApp Project
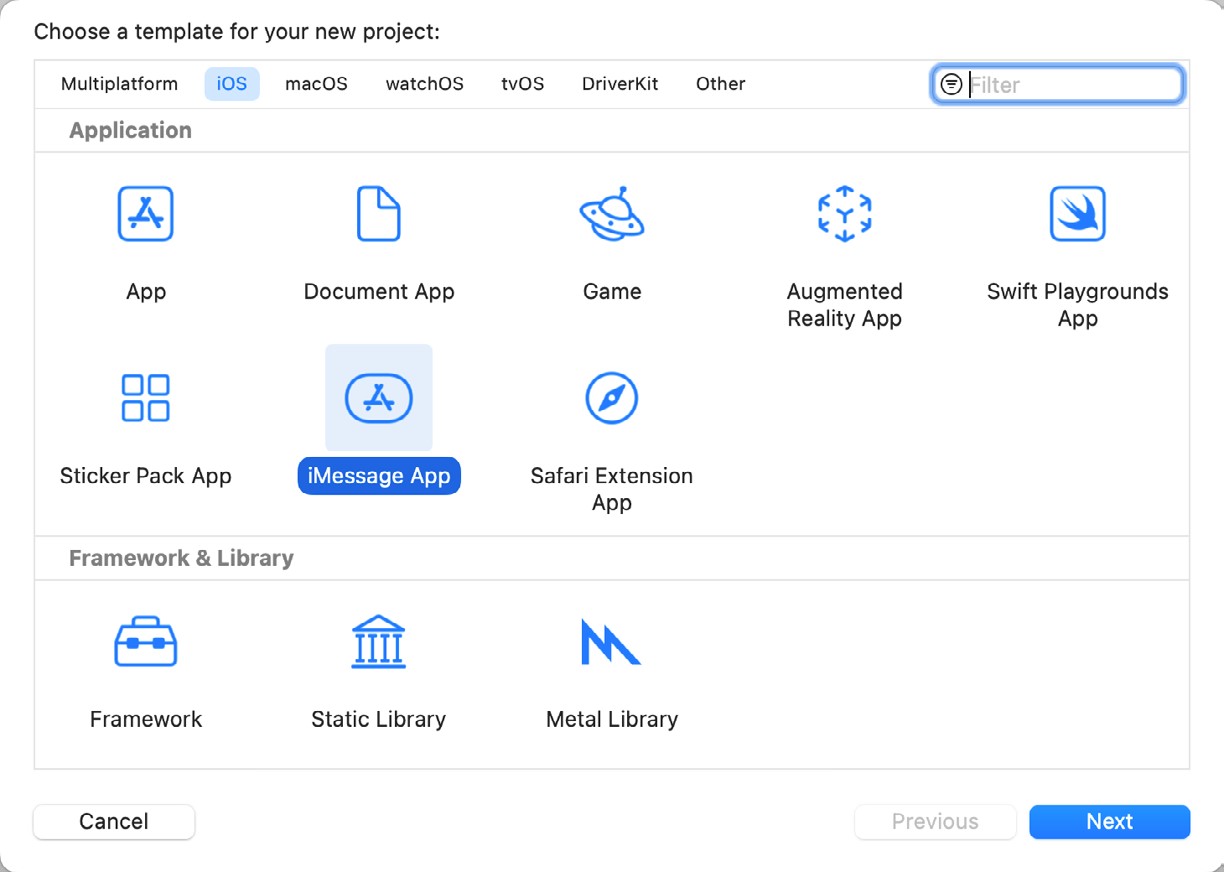
Launch Xcode and select the option to create a new Xcode project. Then, on the template selection screen, select the iMessage App option as illustrated in Figure 80-1 below and click on the Next button:
On the following screen, name the product MessageApp and select Swift as the language. Click the Next button, choose a location for the project files, and click the Create button.
 |
You are reading a sample chapter from Building iOS 17 Apps using Xcode Storyboards.
Buy the full book now in eBook or Print format. The full book contains 96 chapters and 760 pages of in-depth information. |
A review of the project structure in the project navigator panel will reveal that both the main iOS app (named MessageApp) and an extension (MessageExtension) have been created:
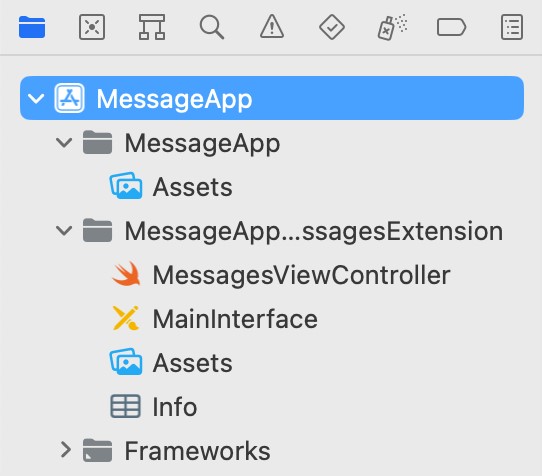
Within the MessagesExtension folder, the MessagesViewController.swift file contains the code for the MSMessagesAppViewController subclass, while the MainInterface.storyboard file contains the user interface for the message app extension. By default, the layout currently consists of a Label object configured to display “Hello World”.
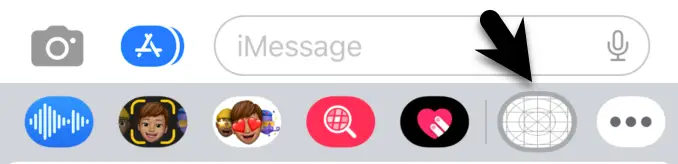
Before making any changes to the project, run the app on an iOS simulator and note that the Message app launches and opens the app drawer containing the new message app extension:
To load the extension, tap the MessageApp icon in the drawer and note that the default “Hello World” user interface appears (Figure 80-4):
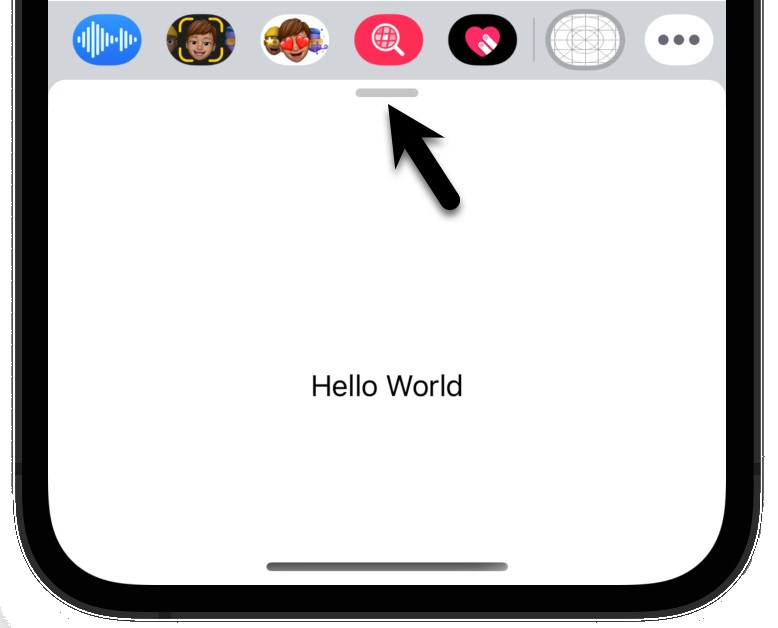
Swiping left or right over the extension app within the drawer will move between the different message apps currently installed on the device. Tapping the handle at the top of the extension panel (indicated by the arrow above) will switch the app from a compact to an expanded presentation style. Tap the handle at the top of the full-screen view to return to the compact presentation style.
|
You are reading a sample chapter from Building iOS 17 Apps using Xcode Storyboards.
Buy the full book now in eBook or Print format. The full book contains 96 chapters and 760 pages of in-depth information. |
Designing the MessageApp User Interface
The message app extension’s user interface will consist of 9 Button objects arranged in a 3×3 grid using UIStackView layouts. Later in the tutorial, screenshots of the current game status will be taken and displayed in the interactive message bubbles. As a workaround for a problem with screenshots and the UIStackView class, the button collection will need to be contained within an additional UIView instance.
Begin the user interface design process by selecting the MainInterface.storyboard file and deleting the “Hello World” Label object. Next, drag and drop a View instance from the Library panel and position it so that it is centered horizontally and located along the bottom margin of the storyboard scene, as illustrated in Figure 80-5:
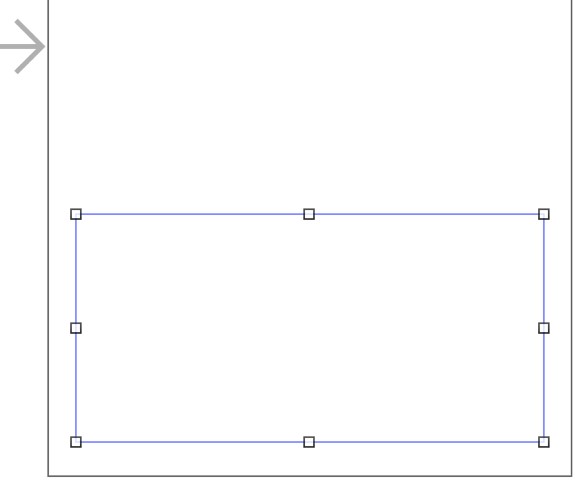
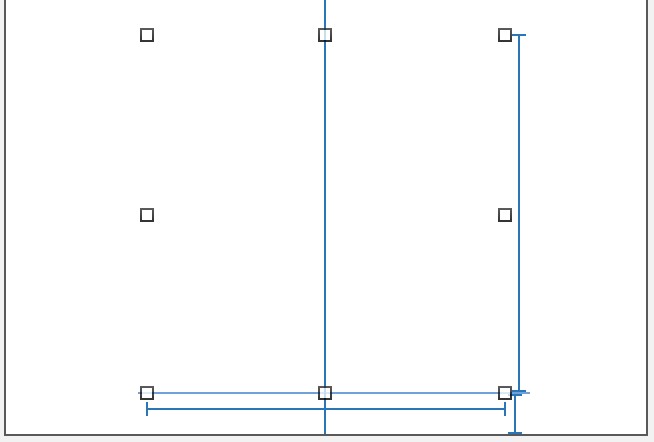
With the View selected, use the Add New Constraints button to add a constraint on the bottom edge of the view with the Constrain to Margins option enabled and both the Height and Width values set to 180. Next, use the Align men and enable the Horizontally in Container constraint. Once these constraints have been applied, the view should resemble Figure 80-6:
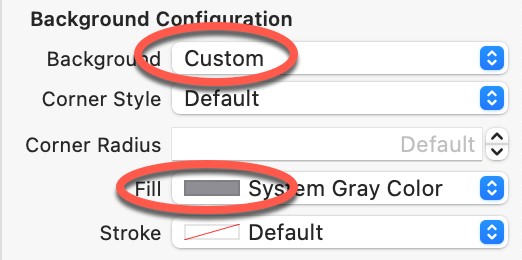
Drag a Button from the palette and place it within the newly added view. With the new button selected, display the Attributes Inspector panel and change the Background color to a light shade of gray. With the button still selected, change the Background property to Custom and the Fill color to a light shade of gray:
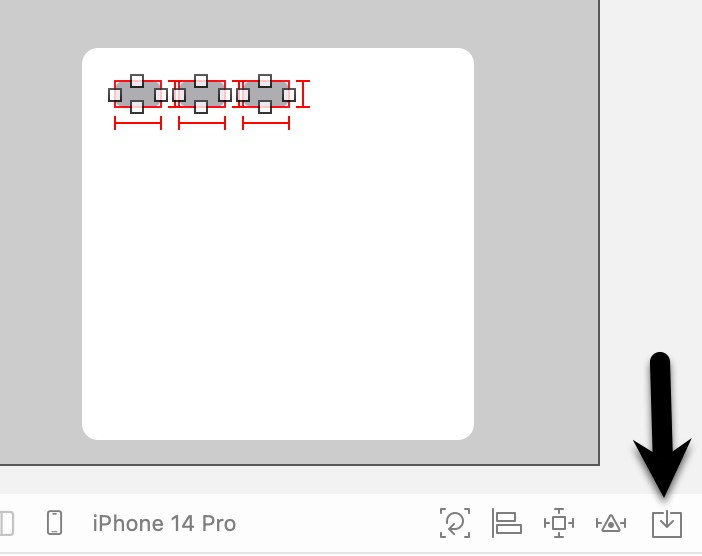
Double-click on the button and delete the current text, then use the Add New Constraints menu to set height and width values to 48 so that the parent view and button match the layout shown below (the button size constraints will take effect when it is embedded in a stack later):
|
You are reading a sample chapter from Building iOS 17 Apps using Xcode Storyboards.
Buy the full book now in eBook or Print format. The full book contains 96 chapters and 760 pages of in-depth information. |

Display the Assistant Editor panel and establish an action connection from the button to a method named buttonPressed, making sure to change the Type value from Any to UIButton before clicking on the Connect button.
Now that the first button has been added and configured, it must be duplicated eight times. Select the button in the layout, and use the Command-C keyboard shortcut to copy and Command-V to paste a duplicate. Position the new button to the right of the first button and continue pasting and moving button instances until there is a row of three buttons. Select the first button in the top row and then hold down the shift key while selecting the remaining two buttons in that row. With all three buttons selected, click on the Embed In button (highlighted in Figure 80-9) and select the Embed In menu option to add the buttons to a Stack View instance:
With the StackView instance selected, use the Attributes Inspector panel to change the Spacing attribute to 2. Repeat these steps to add two more rows of buttons so that each row is contained within a horizontal Stack View.
Display the Document Outline panel, hold down the Command key and select each of the three Stack View instances:
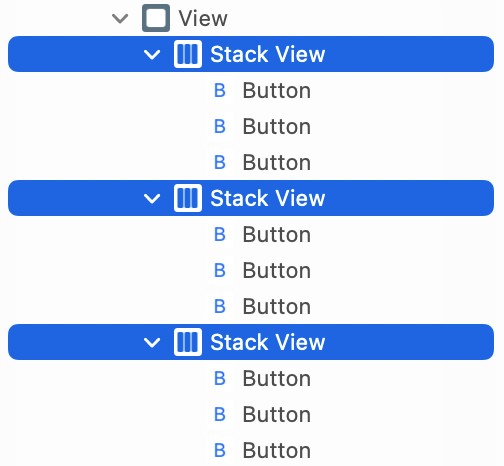
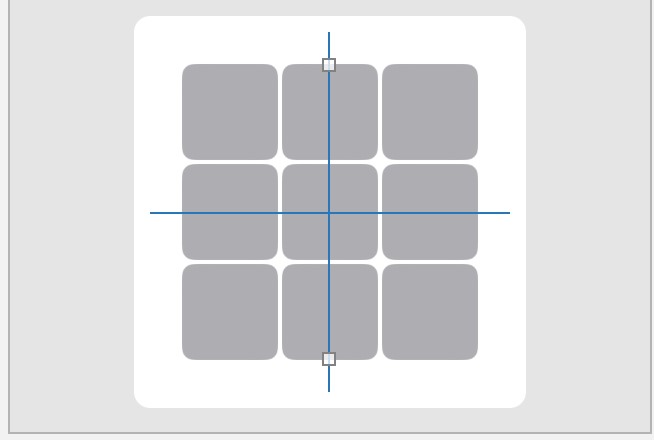
With the three Stack View entries selected, click on the Embed In button in the canvas toolbar once again to add the three horizontal stacks into a single vertical stack. Then, using the Attributes Inspector panel, increase the spacing property on the vertical stack view to 2.
|
You are reading a sample chapter from Building iOS 17 Apps using Xcode Storyboards.
Buy the full book now in eBook or Print format. The full book contains 96 chapters and 760 pages of in-depth information. |
With the vertical stack still selected, display the Auto Layout align menu and enable both the horizontal and vertical center in container options before clicking the Add 2 Constraints button. At this point, the view and grid layout should match Figure 80-11. Before proceeding, display the Assistant Editor and establish an outlet connection for the View object named gridView:
Creating the Outlet Collection
As is invariably the case, the code for the app will need to be able to access the buttons in the user interface via outlets. In this project, all buttons will be connected to the same outlet using an outlet collection.
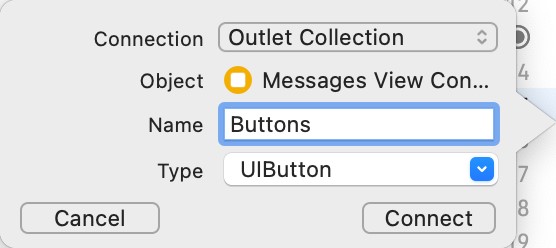
Where a normal outlet contains a reference to a single user interface object, an outlet collection is an array of references to multiple user interface objects. First, display the Assistant Editor and select the first button on the top row of the grid (note that initial selection attempts may select the parent StackView objects, so continue clicking until only the button is selected). Next, create the outlet collection by Ctrl-clicking on the selected button and dragging it to a position beneath the class declaration line in the Assistant Editor panel. When the connection dialog appears, change the Connection menu setting from Outlet to Outlet Collection (Figure 80-12), name the connection Buttons, and click on the Connect button.
To add the second button in the first row, click on the outlet marker in the margin of the Assistant Editor panel and drag to the button as outlined in Figure 80-13:
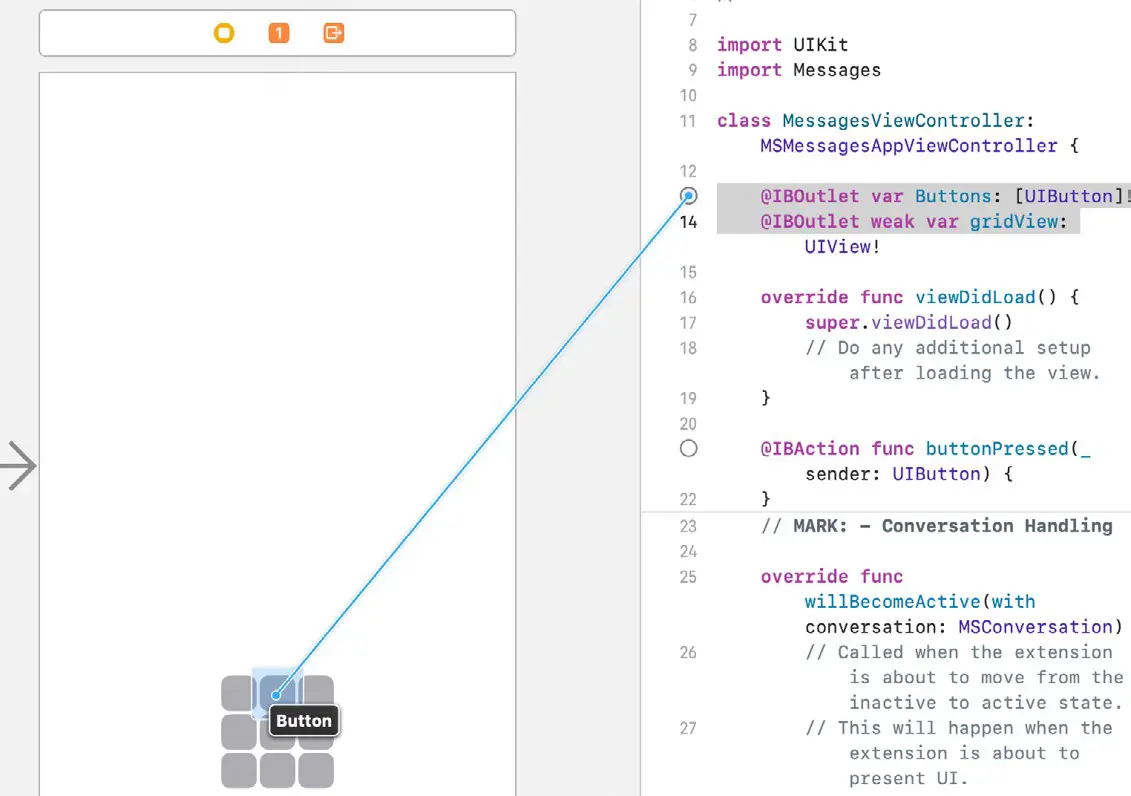
Connect the outlet collection using this technique for the remaining buttons in the grid, taking care to work from left to right and row by row (the order in which the buttons are added to the collection is essential if the game is to function correctly).
|
You are reading a sample chapter from Building iOS 17 Apps using Xcode Storyboards.
Buy the full book now in eBook or Print format. The full book contains 96 chapters and 760 pages of in-depth information. |
Run the extension on the simulator and verify that the layout appears as designed in both compact and expanded presentation styles.
Creating the Game Model
The model for tracking the game’s status is straightforward and consists of an array containing ten string elements. The first element in the array stores the current player (‘X’ or ‘O’), while the remaining nine contain the corresponding buttons’ current settings in the array (‘X’ or ‘O’). In addition, the elements in this array are initialized with ‘-‘ characters to indicate unselected grid locations.
Open the MessagesViewController.swift file and add some variable declarations as follows:
class MessagesViewController: MSMessagesAppViewController {

    @IBOutlet weak var gridView: UIView!
    @IBOutlet var Buttons: [UIButton]!

    var gameStatus = [String](repeating: "-", count: 9)
    var currentPlayer: String = "X"
    var caption = "Want to play Tic-Tac-Toe?"
    var session: MSSession?
.
.Code language: Swift (swift)
In addition to the array declaration, the above changes include a variable to temporarily store the current player setting (which will be placed into the array when the user makes a selection), an initial setting of the message caption, and a variable to store the current MSSession instance.
Responding to Button Selections
Each game button was previously configured to call a method named buttonPressed when tapped. This method needs to identify which button was pressed, store the current player value into the matching element of the game status array, and then change the button’s title to indicate that the current player has selected it. Within the MessagesViewController.swift file, locate the template buttonPressed method and implement the code as follows:
|
You are reading a sample chapter from Building iOS 17 Apps using Xcode Storyboards.
Buy the full book now in eBook or Print format. The full book contains 96 chapters and 760 pages of in-depth information. |
@IBAction func buttonPressed(_ sender: UIButton) {
    for (index, button) in Buttons.enumerated() {
        if button.isEqual(sender) {

            if gameStatus[index].isEqual("-") {
                gameStatus[index] = currentPlayer
                sender.setTitle(currentPlayer, for: .normal)
            }
        }
    }
}Code language: Swift (swift)
When called, this method is passed a reference to the user interface object that triggered the event. The added code iterates through the Buttons outlet collection until it finds the matching button. Using the index value associated with this button, the code then ensures that the corresponding element in the gameStatus array contains a ‘-‘ character. This indicates that the button grid location has not already been selected. If the button is available, the current player’s string value is stored at the corresponding location in the gameStatus array and set as the button title.
Compile and run the message app on a simulator session and verify that clicking on the buttons in the game grid causes an ‘X’ to appear on the clicked button. If the app crashes, then message app extensions probably still aren’t working on the simulator, and you will need two physical iOS devices to continue testing.
Preparing the Message URL
Once the user has selected a game move, the message needs to be prepared and inserted into the message transcript, ready to be reviewed and sent by the user. Part of this message takes the form of a URL which will be used to encode the current game state so that it can be reconstructed when the second player receives the message.
For this example, the URLComponents class will build a URL containing a query item for the current player and nine other items representing each button position’s status in the game grid. Below is an example of how the URL might appear partway through an ongoing game:
https://www.ebookfrenzy.com?currentPlayer=X&position0=X&position1=O&position2=-&position3=-&position4=-&position5=-&position6=X&position7=-&position8=-Code language: HTTP (http)The first part of the URL contains the standard HTTP scheme and domain declaration, while the rest of the URL is comprised of query items. Each query item is represented by a URLQueryItem instance and contains a key-value pair. As seen in the example URL, the first query item contains the key “currentPlayer,” which is currently assigned a value of “X”. The remaining query items have keys ranging from position0 through to position8, with the value of each set to an ‘X’, ‘O’, or ‘-‘ to indicate the current status of the corresponding position in the button grid.
|
You are reading a sample chapter from Building iOS 17 Apps using Xcode Storyboards.
Buy the full book now in eBook or Print format. The full book contains 96 chapters and 760 pages of in-depth information. |
The code to create this URL is going to reside within a method named prepareURL which can now be added to the MessagesViewController.swift file so that it reads as follows:
func prepareURL() -> URL {
    var urlComponents = URLComponents()
    urlComponents.scheme = "https";
    urlComponents.host = "www.ebookfrenzy.com";
    let playerQuery = URLQueryItem(name: "currentPlayer",
				value: currentPlayer)

    urlComponents.queryItems = [playerQuery]

    for (index, setting) in gameStatus.enumerated() {
        let queryItem = URLQueryItem(name: "position\(index)",
						value: setting)
        urlComponents.queryItems?.append(queryItem)
    }
    return urlComponents.url!
}Code language: Swift (swift)
The method begins by creating a URLComponents instance and configuring the scheme and host values. Next, a new query item comprising a key-value pair representing the current player information is created. The code then performs a looping operation through the elements of the gameStatus array. For each element, a new query item is created containing a key-value pair indicating the status of the corresponding grid position, which is then appended to the urlComponent object. Finally, the encoded array is returned.
This new method must be called from within the buttonPressed method when the user has selected a valid button. Now is also a good opportunity to add a call to a method named prepareMessage which will be created in the next section:
@IBAction func buttonPressed(_ sender: Any) {
    for (index, button) in Buttons.enumerated() {
        if button.isEqual(sender) {

            if gameStatus[index].isEqual("-") {
                gameStatus[index] = currentPlayer
                sender.setTitle(currentPlayer, for: .normal)
                let url = prepareURL()
                prepareMessage(url)
            }
        }
    }
}Code language: Swift (swift)
Preparing and Inserting the Message
The steps to create the message will now be implemented within a method named prepareMessage. Add this method as follows to the MessagesViewController.swift file:
func prepareMessage(_ url: URL) {

    let message = MSMessage()

    let layout = MSMessageTemplateLayout()
    layout.caption = caption

    message.layout = layout
    message.url = url

    let conversation = self.activeConversation

    conversation?.insert(message, completionHandler: {(error) in
        if let error = error {
            print(error)
        }
    })
    self.dismiss()
}Code language: Swift (swift)
The method creates a new MSMessage object and a template layout object with the caption set to the current value of the caption variable. The encoded url containing the current game status is then assigned to the url property of the message. Next, a reference to the currently active conversation is obtained before the message is inserted into the iMessage input field, ready to be sent by the player. Finally, the MessagesViewController instance is dismissed from view.
|
You are reading a sample chapter from Building iOS 17 Apps using Xcode Storyboards.
Buy the full book now in eBook or Print format. The full book contains 96 chapters and 760 pages of in-depth information. |
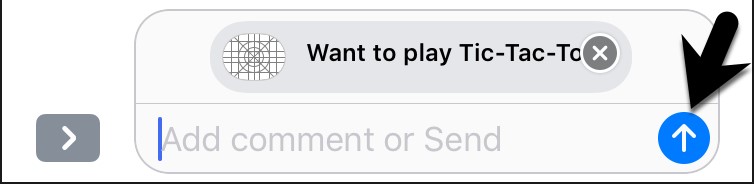
Rerun the message app and click the grid button. Note that the entry now appears in the Messages app input field, ready to be sent to the other player. Click on the send button (highlighted in Figure 80-14) to send the message.
When testing messages in the simulator, the iMessage app simulates a conversation between two users named Kate Bell and John Appleseed. After the message has been sent, click the back arrow in the top left corner of the iMessage screen to move back to the conversation selection screen, select conversation entry and note that the message has arrived:
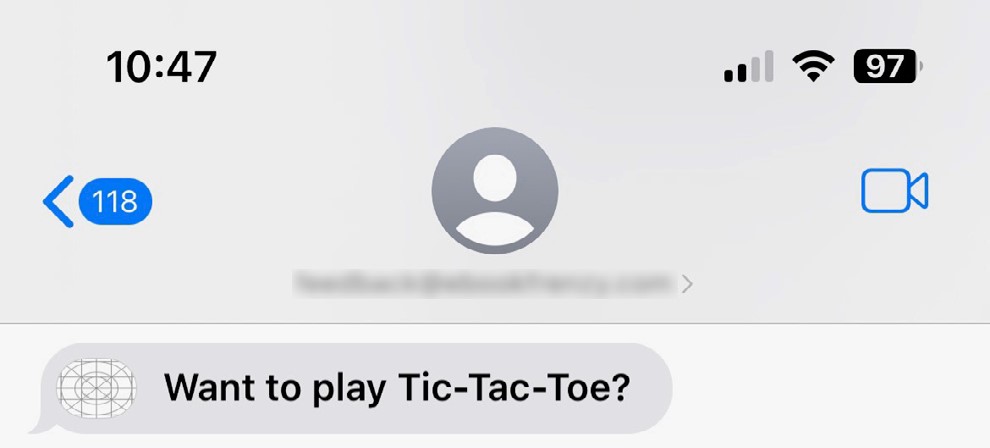
Tap the message to load the message extension where the button grid will appear. A few areas of functionality, however, have yet to be implemented. First, the current state of play is not reflected on the buttons, all of which remain blank. Also, clicking on a button causes an ‘X’ character to appear. Since the first player is represented by ‘X,’ a current selection should display an ‘O’ on the button. Clearly, some code needs to be added to handle the receipt of a message and update the game model within the message app extension.
Message Receipt Handling
The first step in handling the incoming message is to write a method to decode the incoming url and update the gameStatus array with the current status. Within the MessagesViewController.swift file, implement a method for this purpose named decodeURL:
func decodeURL(_ url: URL) {

    let components = URLComponents(url: url,
			resolvingAgainstBaseURL: false)

    for (index, queryItem) in (components?.queryItems?.enumerated())! {

        if queryItem.name == "currentPlayer" {
            currentPlayer = queryItem.value == "X" ? "O" : "X"
        } else if queryItem.value != "-" {
            gameStatus[index-1] = queryItem.value!
            Buttons[index-1].setTitle(queryItem.value!, for: .normal)
        }
    }
}Code language: Swift (swift)
This method performs the reverse of the prepareURL method in that it initiates a URLComponents object from a url and then extracts the value for the current player key, followed by the current setting for each button. If the status of a button is not a ‘-‘ character, then the current value (an X or O) is displayed on the corresponding button.
|
You are reading a sample chapter from Building iOS 17 Apps using Xcode Storyboards.
Buy the full book now in eBook or Print format. The full book contains 96 chapters and 760 pages of in-depth information. |
Next, the code to handle the incoming message needs to be implemented in the willBecomeActive method, a template for which has been placed within the MessagesViewController.swift file ready to be completed. When called by the Message framework, this method is passed an MSConversation object representing the currently active conversation. This object contains a property named selectedMessage referencing the MSMessage object selected by the user to launch the extension. From this object, the url containing the encoded game status data can be extracted, decoded, and used to update the game status within this instance of the message app.
Locate the willBecomeActive method template in the MessagesViewController.swift file and modify it as follows:
override func willBecomeActive(with conversation: MSConversation) {

    if let messageURL = conversation.selectedMessage?.url {
        decodeURL(messageURL)
        caption = "It's your move!"
    }

    for (index, item) in gameStatus.enumerated() {
        if item != "-" {
            Buttons[index].setTitle(item, for: .normal)
        }
    }
}Code language: Swift (swift)
The method gets the url that was embedded into the message and passes it to the decodeURL method for decoding and updating the internal game status model. The caption variable is changed to indicate that this is an ongoing game before a for loop updates the titles displayed on the game buttons.
Test the game again and note that the current game status is preserved between players and that Os are displayed when the second player clicks on the grid buttons.
Setting the Message Image
Currently, the message bubbles in the message transcript area contain the default app icon and the text assigned to the message caption property. A better user experience would be provided if the message bubble’s image property displayed the game’s current status.
|
You are reading a sample chapter from Building iOS 17 Apps using Xcode Storyboards.
Buy the full book now in eBook or Print format. The full book contains 96 chapters and 760 pages of in-depth information. |
A quick way of achieving this result is to take a screenshot of the gameView View object in which the grid layout resides. This can be achieved by adding some code to the prepareMessage method as follows:
func prepareMessage(_ url: URL) {

    let message = MSMessage()
    let layout = MSMessageTemplateLayout()
    layout.caption = caption

    UIGraphicsBeginImageContextWithOptions(gridView.bounds.size,
		gridView.isOpaque, 0);
    self.gridView.drawHierarchy(in: gridView.bounds,
		afterScreenUpdates: true)

    layout.image = UIGraphicsGetImageFromCurrentImageContext()!
    UIGraphicsEndImageContext()

    message.layout = layout
    message.url = url

    let conversation = self.activeConversation
    conversation?.insert(message, completionHandler: {(error) in
        if let error = error {
            print(error)
        }
    })
    self.dismiss()
}Code language: Swift (swift)
This new code designates a graphic context covering the screen area containing the gridView object. A graphics rendering of the view hierarchy of which gridView is the parent is then drawn into the context. Finally, an image is generated and displayed as the image property of the message layout object.
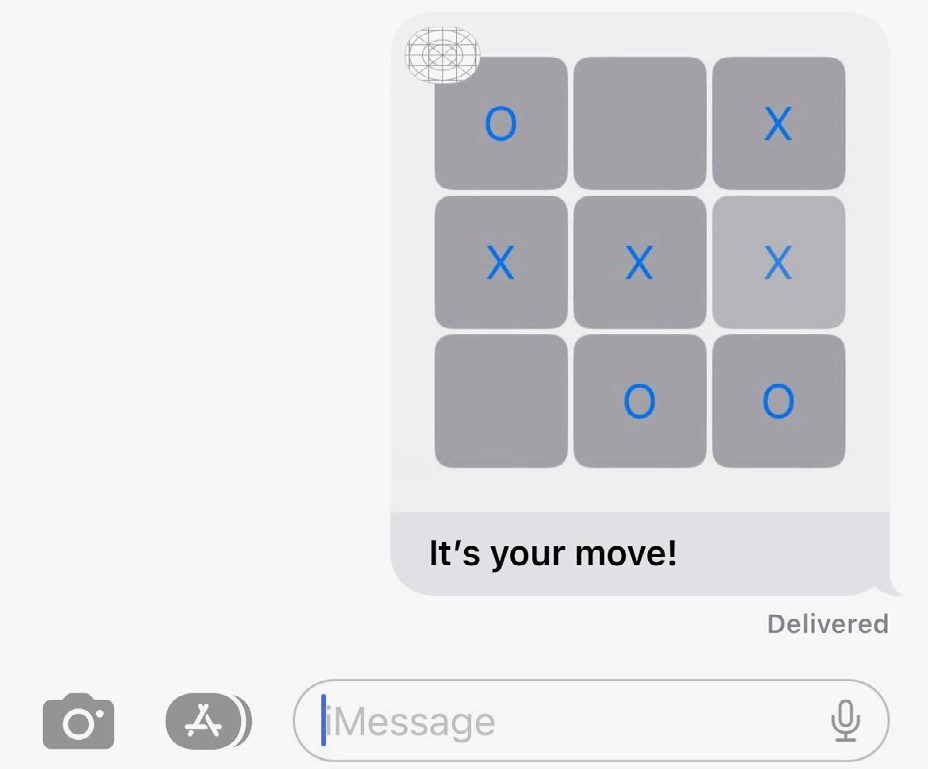
When the app is tested, the message bubbles should now contain an image showing the current status of the tic-tac-toe grid:
Summary
The Message framework allows message app extensions to be integrated into the standard iOS Messages app. These extensions allow interactive messages to be sent between users. This process involves obtaining a reference to the currently active conversation and creating and configuring an MSMessage object, which is then inserted into the conversation. Data to be transferred with the message may be encoded into a URL using the URLComponents class and then assigned to the URL property of the MSMessage object. This data is then decoded when received by another instance of the app extension and used to restore the app’s state.
This chapter has worked through creating an example app designed to demonstrate the key steps in developing an interactive message app.
|
You are reading a sample chapter from Building iOS 17 Apps using Xcode Storyboards.
Buy the full book now in eBook or Print format. The full book contains 96 chapters and 760 pages of in-depth information. |