
One of the first problems users and system administrators encounter is that systems need more disk space to store data. Fortunately, disk space is now one of the cheapest IT commodities. In this and the next chapter, we will look at the steps necessary to configure RHEL 9 to use the space provided by installing a new physical or virtual disk drive.
Mounted File Systems or Logical Volumes
There are two ways to configure a new disk drive on a RHEL 9 system. One straightforward method is to create one or more Linux partitions on the new drive, create Linux file systems on those partitions and then mount them at specific mount points to be accessed. This approach will be covered in this chapter.
Another approach is adding new space to an existing volume group or creating a new one. When RHEL 9 is installed, a volume group is created and named rhel. Within this volume group are three logical volumes named root, home, and swap, used to store the / and /home file systems and swap partitions, respectively. We can increase the disk space available to the existing logical volumes by configuring the new disk as part of a volume group. For example, using this approach, we can increase the size of the /home file system by allocating some or all of the space on the new disk to the home volume. This topic will be discussed in detail in Adding a New Disk to a RHEL 9 Volume Group and Logical Volume.
Finding the New Hard Drive
This tutorial assumes that a new physical or virtual hard drive has been installed and is visible to the operating system. Once added, the operating system should automatically detect the new drive. Typically, the disk drives in a system are assigned device names beginning hd, sd, or nvme, followed by a letter to indicate the device number. The first device might be /dev/sda, the second /dev/sdb, etc.
The following is the output from a typical system with only one disk drive connected to a SATA controller:
 |
You are reading a sample chapter from Red Hat Enterprise Linux 9 Essentials. Buy the full book now in eBook or Print format.
Includes 34 chapters and 290 pages. Learn more. |
# ls /dev/sd*
/dev/sda  /dev/sda1  /dev/sda2
This shows that the disk drive represented by /dev/sda is divided into two partitions, represented by /dev/sda1 and /dev/sda2.
The following output is from the same system after a second hard disk drive has been installed:
# ls /dev/sd*
/dev/sda /dev/sda1 /dev/sda2 /dev/sdb
The new hard drive has been assigned to the device file /dev/sdb. The drive has no partitions shown (because we have yet to create any).
At this point, we can create partitions and file systems on the new drive and mount them for access or add the disk as a physical volume as part of a volume group. To perform the former continue with this chapter; otherwise, read Adding a New Disk to a RHEL 9 Volume Group and Logical Volume for details on configuring Logical Volumes.
Creating Linux Partitions
The next step is to create one or more Linux partitions on the new disk drive. This is achieved using the fdisk utility, which takes as a command-line argument the device to be partitioned:
|
You are reading a sample chapter from Red Hat Enterprise Linux 9 Essentials. Buy the full book now in eBook or Print format.
Includes 34 chapters and 290 pages. Learn more. |
# fdisk /dev/sdb

Welcome to fdisk (util-linux 2.37.4).
Changes will remain in memory only, until you decide to write them.
Be careful before using the write command.

Device does not contain a recognized partition table.
Created a new DOS disklabel with disk identifier 0x64d68d00.

Command (m for help):
To view the current partitions on the disk, enter the p command:
Command (m for help): p
Disk /dev/sdb: 14.46 GiB, 15525216256 bytes, 30322688 sectors
Disk model: USB 2.0 FD
Units: sectors of 1 * 512 = 512 bytes
Sector size (logical/physical): 512 bytes / 512 bytes
I/O size (minimum/optimal): 512 bytes / 512 bytes
Disklabel type: dos
Disk identifier: 0x64d68d00
As we can see from the above fdisk output, the disk currently has no partitions because it was previously unused. The next step is to create a new partition on the disk, a task which is performed by entering n (for new partition) and p (for primary partition):
Command (m for help): n
Partition type
   p   primary (0 primary, 0 extended, 4 free)
   e   extended (container for logical partitions)
Select (default p): p
Partition number (1-4, default 1):
In this example, we only plan to create one partition, which will be partition 1. Next, we need to specify where the partition will begin and end. Since this is the first partition, we need it to start at the first available sector, and since we want to use the entire disk, we specify the last sector as the end. Note that if you wish to create multiple partitions, you can specify the size of each partition by sectors, bytes, kilobytes, or megabytes:
Partition number (1-4, default 1): 1
First sector (2048-30322687, default 2048):
Last sector, +/-sectors or +/-size{K,M,G,T,P} (2048-30322687, default 30322687):

Created a new partition 1 of type 'Linux' and of size 14.5 GiB.

Command (m for help):
Now that we have specified the partition, we need to write it to the disk using the w command:
Command (m for help): w
The partition table has been altered.
Calling ioctl() to re-read partition table.
Syncing disks.
If we now look at the devices again, we will see that the new partition is visible as /dev/sdb1:
|
You are reading a sample chapter from Red Hat Enterprise Linux 9 Essentials. Buy the full book now in eBook or Print format.
Includes 34 chapters and 290 pages. Learn more. |
# ls /dev/sd*
/dev/sda /dev/sda1 /dev/sda2 /dev/sdb /dev/sdb1
The next step is to create a file system on our new partition.
Creating a File System on a RHEL 9 Disk Partition
We now have a new disk installed, it is visible to RHEL 9, and we have configured a Linux partition on the disk. The next step is to create a Linux file system on the partition so that the operating system can use it to store files and data. The easiest way to create a file system on a partition is to use the mkfs.xfs utility:
meta-data=/dev/sdb1              isize=512    agcount=4, agsize=947520 blks
         =                       sectsz=512   attr=2, projid32bit=1
         =                       crc=1        finobt=1, sparse=1, rmapbt=0
         =                       reflink=1    bigtime=1 inobtcount=1
data     =                       bsize=4096   blocks=3790080, imaxpct=25
         =                       sunit=0      swidth=0 blks
naming   =version 2              bsize=4096   ascii-ci=0, ftype=1
log      =internal log           bsize=4096   blocks=2560, version=2
         =                       sectsz=512   sunit=0 blks, lazy-count=1
realtime =none                   extsz=4096   blocks=0, rtextents=0
In this case, we have created an XFS file system. XFS is a high-performance file system that is the default filesystem type on RHEL 9 and includes several advantages in terms of parallel I/O performance and the use of journaling.
An Overview of Journaled File Systems
A journaling filesystem keeps a journal or log of the changes being made to the filesystem during disk writing that can be used to rapidly reconstruct corruptions that may occur due to events such as a system crash or power outage.
There are several advantages to using a journaling file system. First, the size and volume of data stored on disk drives have grown exponentially over the years. The problem with a non-journaled file system is that following a crash, the fsck (filesystem consistency check) utility has to be run. The fsck utility will scan the entire filesystem validating all entries and ensuring that blocks are allocated and referenced correctly. It will attempt to fix the problem if it finds a corrupt entry. The issues here are two-fold. First, the fsck utility will not always be able to repair the damage, and you will end up with data in the lost+found directory. An application uses this data, but the system no longer knows where it was referenced from. The other problem is the issue of time. Completing the fsck process on an extensive file system can take a long time, potentially leading to unacceptable downtime.
|
You are reading a sample chapter from Red Hat Enterprise Linux 9 Essentials. Buy the full book now in eBook or Print format.
Includes 34 chapters and 290 pages. Learn more. |
On the other hand, a journaled file system records information in a log area on a disk (the journal and log do not need to be on the same device) during each write. This is essentially an “intent to commit” data to the filesystem. The amount of information logged is configurable and ranges from not logging anything to logging what is known as the “metadata” (i.e., ownership, date stamp information, etc.) to logging the “metadata” and the data blocks that are to be written to the file. Once the log is updated, the system writes the actual data to the appropriate filesystem areas and marks an entry to say the data is committed.
After a crash, the filesystem can quickly be brought back online using the journal log, thereby reducing what could take minutes using fsck to seconds with the added advantage that there is considerably less chance of data loss or corruption.
Mounting a File System
Now that we have created a new file system on the Linux partition of our new disk drive, we need to mount it to be accessible and usable. To do this, we need to create a mount point. A mount point is simply a directory or folder into which the file system will be mounted. For this example, we will create a /backup directory to match our file system label (although these values don’t need to match):
# mkdir /backup
The file system may then be manually mounted using the mount command:
# mount /dev/sdb1 /backup
Running the mount command with no arguments shows us all currently mounted file systems (including our new file system):
|
You are reading a sample chapter from Red Hat Enterprise Linux 9 Essentials. Buy the full book now in eBook or Print format.
Includes 34 chapters and 290 pages. Learn more. |
# mount
proc on /proc type proc (rw,nosuid,nodev,noexec,relatime)
sysfs on /sys type sysfs (rw,nosuid,nodev,noexec,relatime,seclabel)
.
.
/dev/sdb1 on /backup type xfs (rw,relatime,seclabel,attr2,inode64,logbufs=8,logbsize=32k,noquota)
Configuring RHEL 9 to Mount a File System Automatically
To set up the system so that the new file system is automatically mounted at boot time, an entry needs to be added to the /etc/fstab file. The format for an fstab entry is as follows:
<device> <dir> <type> <options> <dump> <fsck>
These entries can be summarized as follows:
- <device> – The device on which the filesystem will be mounted.
- <dir> – The directory that is to act as the mount point for the filesystem.
- <type> – The filesystem type (xfs, ext4 etc.)
- <options> – Additional filesystem mount options, for example, making the filesystem read-only or controlling whether any user can mount the filesystem. Run man mount to review a complete list of options. Setting this value to defaults will use the default settings for the filesystem (rw, suid, dev, exec, auto, nouser, async).
- <dump> – Dictates whether the content of the filesystem is to be included in any backups performed by the dump utility. This setting is rarely used and can be disabled with a 0 value.
- <fsck> – Whether the filesystem is checked by fsck after a system crash and the order in which filesystems are to be checked. For journaled filesystems such as XFS this should be set to 0 to indicate that the check is not required.
The following example shows an fstab file configured to automount our /backup partition on the /dev/sdb1 partition:
/dev/mapper/rhel-root   /                       xfs     defaults        0 0
UUID=b4fc85a1-0b25-4d64-8100-d50ea23340f7 /boot                   xfs     defaults        0 0
/dev/mapper/rhel-home   /home                   xfs     defaults        0 0
/dev/mapper/rhel-swap   swap                    swap    defaults        0 0
/dev/sdb1               /backup                 xfs     defaults        0 0
The /backup filesystem will now automount each time the system restarts.
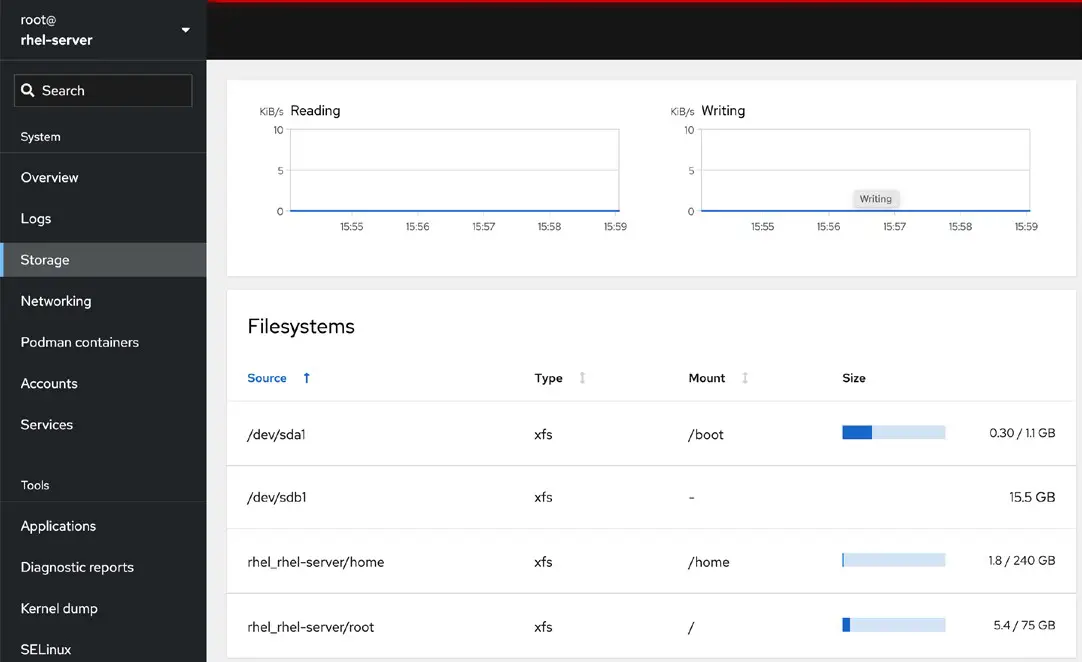
Adding a Disk Using Cockpit
In addition to working with storage using the command-line utilities outlined in this chapter, it is also possible to configure a new storage device using the Cockpit web console. To view the current storage configuration, log into the Cockpit console and select the Storage option as shown in Figure 31-1:
|
You are reading a sample chapter from Red Hat Enterprise Linux 9 Essentials. Buy the full book now in eBook or Print format.
Includes 34 chapters and 290 pages. Learn more. |
To locate the newly added storage, scroll to the bottom of the Storage page until the Drives section comes into view (note that the Drives section may also be located in the top right-hand corner of the screen):
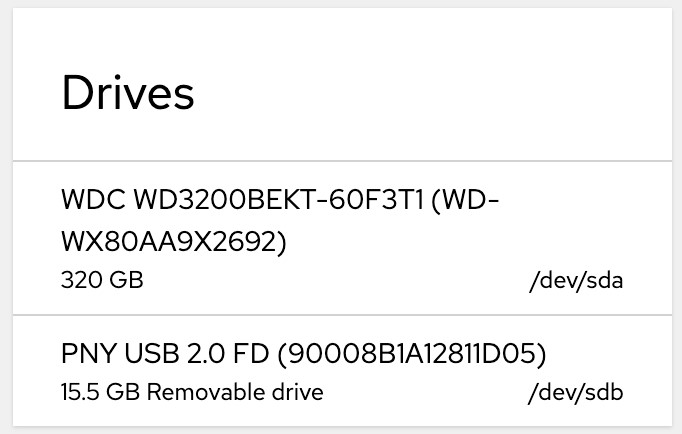
In the case of the above figure, the new drive is the 15.5 GB drive. Select the new drive to display the Drive screen as shown in Figure 31-3:

Click on the Create partition button and use the dialog to specify how much space will be allocated to this partition, the filesystem type (XFS is recommended), and an optional label, filesystem mount point, and mount options. Note that additional partitions may be added to the drive if this new partition does not use all the available space. To change settings such as whether the filesystem is read-only or mounted at boot time, change the settings in the Mount options section:
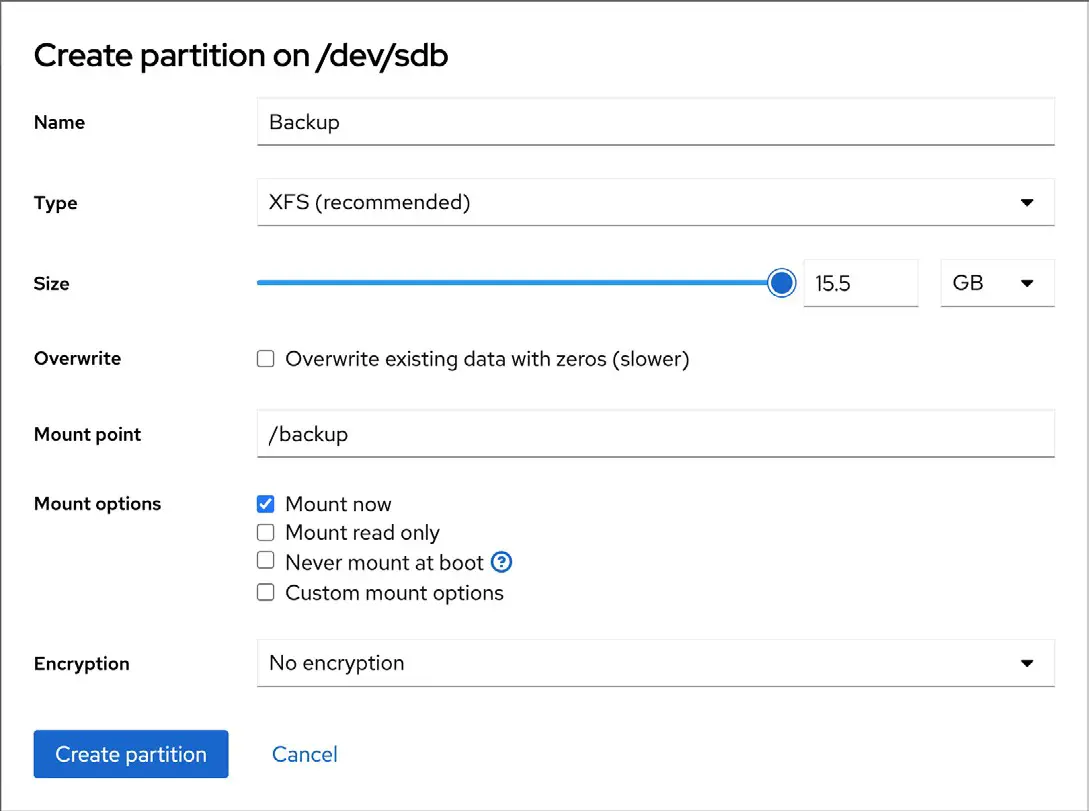
Once the settings have been selected, click the Create partition button to commit the change. Upon completion of the creation process, the new partition will be added to the disk, the corresponding filesystem will be created and mounted at the designated mount point, and appropriate changes will be made to the /etc/fstab file.
Summary
This chapter has covered adding a physical or virtual disk drive to an existing RHEL 9 system. This is a relatively simple process of ensuring the new drive has been detected by the operating system, creating one or more partitions on the drive, and then making filesystems on those partitions. Although several filesystem types are available on RHEL 9, XFS is generally recommended. Once the filesystems are ready, they can be mounted using the mount command. So that the newly created filesystems mount automatically on system startup, additions can be made to the /etc/fstab configuration file.
|
You are reading a sample chapter from Red Hat Enterprise Linux 9 Essentials. Buy the full book now in eBook or Print format.
Includes 34 chapters and 290 pages. Learn more. |